
What You Need
Dragonhead Bangers Bangers are the players of the game, intrepid souls eager to embark on epic quests into ages untold. This is you! Your armaments? A freshly printed character sheet, a pencil with a good eraser and a set of dice. Miniatures are optional. Imagination essential!
Dragonhead Master The Master or DM represents the world the adventure takes place in and plays the part of the creatures you encounter. If you don't have a DM, everyone should roll a 1d20. The highest roller is your group's new Dragonhead Master. All hail the new DM!
Polyhedral Dice For dice you need at least one set of polyhedrals containing a d4, d6, d8, d10, d12, d20 and d00. If you don't know dice, the d stands for die and the number is the biggest number it generates, which normally is the count of sides on that die. A d6 is your standard six-sided die. When a number appears before the d that is the number of times you roll it. A 3d6 means either roll a six-sided die three times or roll three six-siders and add them up.
Percentile Dice The d00 is known as the percentile die. Both it and the d10 have ten sides but the d00 has two numbers per side. Roll them together to create a number from 1 to 100. The d00 provides the tens digit. The d10 provides the ones digit.
| d00 | d10 | Die Roll |
| 50 | 2 | 52 |
| 00 | 1 | 1 |
| 00 | 0 | 100 |
That last one tends to throw people off, but rolling nothing but zeros is a 100. When rolled separately, rolling a 00 on the d00 is 100 and rolling a 0 on the d10 is a 10.
Downloads At the very least you are going to need the Character Sheet pdf which contains not just the game's character sheet but the dice table, placemat and a number of cheat sheets to help you play the game. Optional but also quite useful is the Challenge Wheel which is used to help turn strengths into successes.
A Place to Play Preferably a large table with nice seats in a room without much noise. If you can't hear what is being said you can't play the game. If snacks will be had, be sure to bring something to share or at least be ready to throw in for pizza.
Game Time Time mentioned in the rules has nothing to do with time spent at the game table. Depending on what is happening, a few seconds for the characters might take a few minutes for the players, meanwhile a few months could pass in a matter of seconds. Game Time is supremely flexible.
The only time that matters for players is the Game Session. This is what we have to play with and can range from ten minutes to three hours. Once you hit that three hour mark you should either start a new game session or call it a night.
Yes there is a reason for that.
Concepts
These often trip people up when they don't know about them. So here they are. Watch your feet and consider yourself warned.
Settings This rule book isn't just the guts of a printed book splatted on screen for your amusement. It is an interactive ruleset that can be customized to your prefered way of playing. Once you sign in, click on the Settings button in the toolbar and under Rules you will find what can be changed. Currently you have the game set at:
| Challenge | Normal |
| Dice Mechanic | d20 |
| Difficulty | Dice Rolls |
| Encumbrance | Off |
Which is not a bad way to get started. Be sure to synchronize this with your fellow players so you are all playing by the same rules.
Exceptions Many of the rules in this book are fairly cut and dry but all come with an unwritten caveat — unless something says otherwise — meaning there will always be exceptions. For example, you cannot sleep in your armor (unless something says otherwise). In the class description of the Dwarf it says that they can sleep in their armor so this rule does not apply to them.
Characters & Creatures Bangers run Characters while the Master runs Creatures. Both are figments of your imagination defined by a bunch of stats on a page. They play by the same rules making the two terms interchangeable. Unless something says otherwise (there it is again!) what applies to characters also applies to creatures and vice-versa.
Always Round Down The math in this game is nothing complex but every now and then it will leave you with a decimal point. When that happens simply lop it off, aka Round Down. A 7.1 as well as a 7.5 and 7.9 all round down to 7.
Threshold Tables Many of the tables used in the game are Threshold Tables. Each entry starts with a single threshold number like so:
The number tells you where the entry begins. Roll a 1d12 with the table above and a 3 would have you encountering some Hobgoblins. A 4 would have crossed that threshold and met up with some Orcs. Anything with a 9 or higher is an encounter with some Elves.
A cool thing about threshold tables is that because we always count from low to high they can be arranged in ascending or descending order or even laid out on their side like so:
The Middle Players always roll the dice. DMs have the option of taking the middle. Take the best possible roll, cut it in half and round down. Instead of rolling 3d6, whose best possible roll is 18, you get a 9. Using the middle is not as much fun as rolling the dice but it helps immensely when dealing with large numbers of creatures.
Knowing The Rules For most games you need to know the rules, if not memorize them, before you can play.
This is not one of them.
If you are short on time, borrow a character from someone at the table, explain to them you have no idea what you are doing, and just play the game. RPGs are collaborative not competitive. The people around the table will probably be more than eager to fill you in on how the game is played. This isn't poker. There is nothing to gain from trying to outdo you and everything to be gained from helping you become a better player.
In truth, RPGs tend to be very simple systems which seem imposing because they cover a lot of territory. With Dragonhead the core of the game is this: you tell the table what you are doing, roll some dice and hope to roll high.
Real Playing Game You thought the R stood for Role? Not in Dragonhead. Here the R stands for Real. While there is a decent amount of role-playing involved and many fantastic things can happen, at base we play by reality's rules hence the term Real Playing Game.
Ultimately, this is what separates all RPGs from other games. In Monopoly you can only move around the board in a clockwise direction. Your actions are limited to buying hotels, paying rent, drawing cards, etc. If Monopoly were Dragonhead you could cut across the board, break your friends out of jail and party like rock stars, trashing the hotels on Boardwalk.
You may not get away with it,
but you can try.
When it comes to what a character can or cannot do in a real playing game, we imagine it happening as if it were all really happening and go with what our imaginations show us, keeping things true to life.
The rules are not here to limit your actions.
The rules are here to make the fantasy seem real.
Mojos
Dragonhead is an Omniscient RPG. In it you and your friends are unacknowledged gods. Your characters are your chosen heroes. Sometimes you speak on their behalf. Other times you talk as if they were in the room with you. As a god you have a celestial currency known as the Mojo which allows you to assert your divine presence and pull the strings of fate in their favor.
Each game officially begins with everyone (DM included) making a mojo roll at the exact same time to determine how many mojos they start with. What you roll depends on how many people are at the table. Anyone who shows up late to the game can still play but they get no mojo.
| Players | Mojo Roll |
| 1 | 5d6 |
| 2 to 4 | 3d6 |
| 5 to 8 | 2d6 |
| 9 or more | 1d6 |
Anything from quarters to checkers can be used as a mojos, but the plastic gold coins sold as Pirates Treasure work best. You will also need a bowl to collect them in as mojos are spent. During an adventure here is what they can do and how much it costs.
Fudge The Dice 1 Mojo. Don't like what you rolled? Spend a mojo and re-roll the dice. This can be done up to three times per dice roll. You may not return to a better roll.
Rise Above 1 Mojo. The character becomes filled with an inexplicable surge of energy. Each Mojo spent adds a +2 to the score being checked.
Divine Wind 2 Mojos. A mysterious wind blows away 1d20 points of wear damage. Additional characters may be healed by the wind at a cost of 1 Mojo per character. Roll separately for each character.
Premonition 3 Mojos. Retroactively, you grant a character a premonition allowing them to see the mess they are currently in and have done something about it beforehand.
Gift of the Gods 5 Mojos. You bestow upon the party something they desperately need. This should not be a major game changer, such as an important villain found inexplicably tied up in the town square.
Resurrection 7 Mojos. You bring a character back from the dead. The character will be as healthy as they had been during the last year of their life. They will have no idea what just happened or how or why they are alive again.
Dream Sequence 9 Mojos. Everything that happened since the last time the characters slept was a bad dream of ill portents which the party just woke up from. Do they dare try it again?
Act of God 12 Mojos. In the grand scheme of things, earthquakes, forest fires, and comet strikes happen all the time. This one just happened to happen right when the party needed it to.
Mojos can be spent on characters or creatures. You may even pool your resources to pull off something big like an Act of God. However, the only way to get mojos is to show up to the game on time, or play until the current session ends and a new one begins. Mojos do not carry over between gaming sessions so use them before you lose them!
Character
Every banger needs at least one character to give them a presence in the world. While there are rules for character creation, sometimes the quickest way to get going is to use one of the game's sample characters such as our favorite wanna-be warlord Megan Steelion.
Dragonhead character sheets are designed to be printed in landscape mode on the front and back of a single sheet of paper. Down the middle of the sheet is a thin silver line. Fold the sheet along this line and it divides the sheet into four smaller pages known as Character, Combat, Equipment and Experience.
Character
Character contains all of a character's abilities, class features, skills, name, etc. Aka the stuff you need outside of combat.
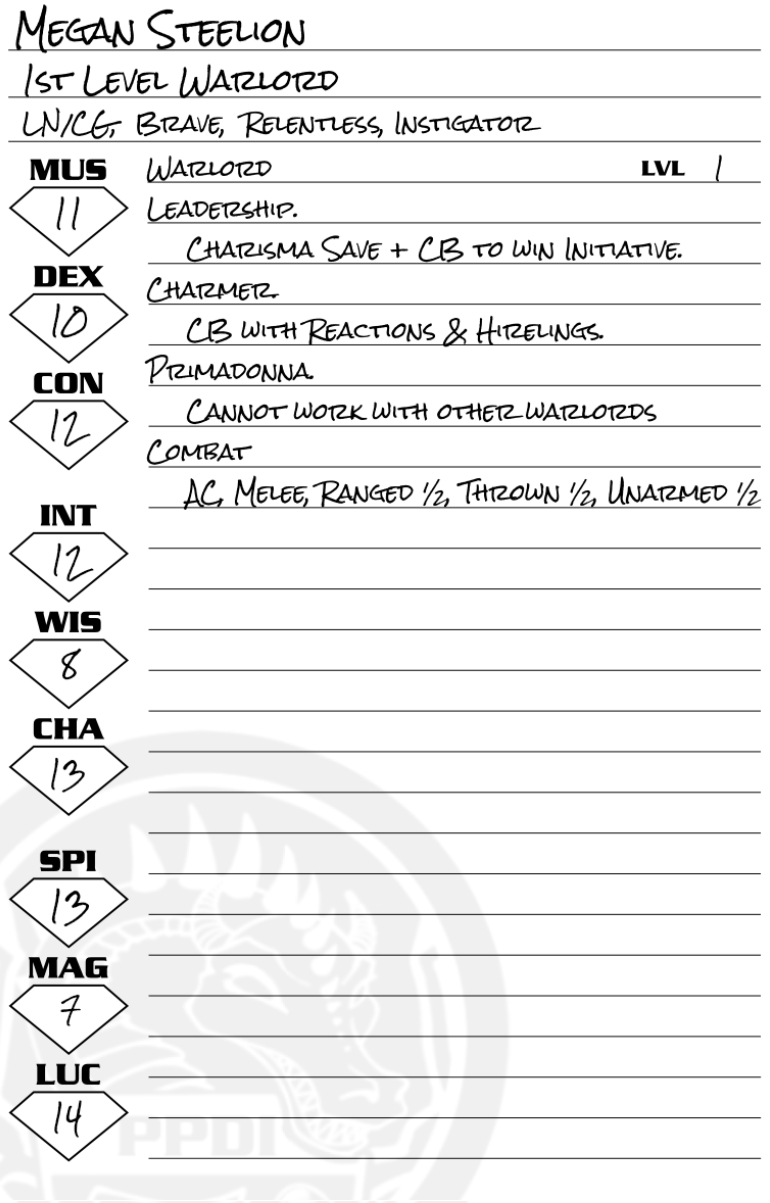
Existence This is our name for the top three lines. The character's name goes on the first line. Character Level and class go on the second line. Inclination and personality go on the third line.
Character Level encompasses the entire character and comes from the amount of XP spent on the character. We use it to pair characters with adventures. Megan is a 2nd level character and still a beginner with this whole adventuring thing.
| Adventure | Levels |
| Beginner | 1 to 3 |
| Intermediate | 4 to 6 |
| Expert | 7 to 9 |
| Hero | 10 to 12 |
| Master | 13 to 15 |
| Demigod | 16 and Up |
Personality A character's personality begins with Inclination and ends with some personality traits. Inclination tells us how a character is inclined to act:
| LG | = Lawful Good |
| NG | = Neutral Good |
| CG | = Chaotic Good |
| LN | = Lawful Neutral |
| TN | = True Neutral |
| CN | = Chaotic Neutral |
| LE | = Lawful Evil |
| NE | = Neutral Evil |
| CE | = Chaotic Evil |
Megan has two inclinations separated by a slash: LN / CG. The first is the character's Social Inclination. This is the face they show the world. It's how they want to be known and shows up in the way they dress, the way they talk, the friends they keep, etc. The second is their True Inclination. This is who they truly are on the inside. If the character has just one inclination then they are the same inside and out.
Megan is Lawful Neutral on the outside and Chaotic Good on the inside. She also tends to be Brave, Relentless and something of an Instigator. Personality traits are non-binding, meaning nothing bad will happen if you go against the grain of them. However we don't put stuff at the top of the sheet to be ignored.
Abilities Streaming down the left side of the sheet are your nine abilities. Three physical. Three mental. Three metaphysical. They are often known by the first three letters of each ability name.
| Mus = Muscle, the meat that makes your body go. | |
| Con = Constitution, your health and natural good looks. | |
| Dex = Dexterity, the ability to move with speed and precision. | |
| Int = Intellect, the sharpness of your mind. | |
| Wis = Wisdom, your intuition and perception. | |
| Cha = Charisma, the force of your personality. | |
| Spi = Spirit, the source of will. | |
| Mag = Magic, your natural talent with the force of magic. | |
| Luc = Luck, the grace of the universe shining upon you. | |
Each ability comes with a modifier to tell us how potent it is. Characters generally start out average with modifiers ranging from -1 to +1 with +0 considered perfectly normal. Megan is no exception. She is very charismatic, spirited and lucky, but don't let her near any magical items. Ultimately, a modifier can go as low as -5 and has no upper limit.
| Awesome | +4 to +5 |
| Excellent | +2 to +3 |
| Average | -1 to +1 |
| Pathetic | -2 to -3 |
| Sad | -4 to -5 |
The number in the silver area at the bottom of the diamond is the ability score. This is only used during character creation.
Class There are three different kinds of classes: Races, Callings, and Transformations. A race is something you are born into such as Elf or Dwarf. A calling is a direction in life you feel called to pursue like Warlord or Wizard. A transformation comes from something happening to your character while out on adventure. A werewolf bite turns you into a Werewolf. All callings and transformations are human by default but may be used by other races.
Classes come with a level to tell us how advanced the character is in it. The more advanced you are the more potent you become.
| Beginner | 1 to 3 |
| Intermediate | 4 to 6 |
| Expert | 7 to 9 |
| Hero | 10 to 12 |
| Master | 13 to 15 |
| Demigod | 16 and up |
While this is the same table used by Character Level, it is good not to confuse the two. Anything a class is good with gets a Class Bonus equal to the class level. Megan is a 2nd level character but only a 1st level Warlord, so she gets a +1 when doing Warlord things.
Classes also come with a number of special features commonly scribbled beneath the class name on the character sheet. Be sure to take a moment and read about your class and its features before the game begins.
Skills Dragonhead is not a skill-based game. Skills exist to help you do things better. There are only a few notable exceptions, such as the Language skills, where you need the skill to do its thing. Without a language skill you cannot speak a language. If you have no language skills you don't speak anything. You get by with emotive grunts, barks and other mouth noises. Likewise, everyone in Dragonhead is functionally illiterate. You cannot read or write without the Read & Write skill. Although, once you have it you may read or write any language you speak.
Megan has Common +0 and Read & Write +0. Common is the language of trade and called as such because it is so commonly spoken. All skills start at +0 which is not very helpful but it does tell us that she possesses them.
Combat
The combat page contains everything you need for combat. The area at the top is for taking damage. The area below it is for dishing it out.
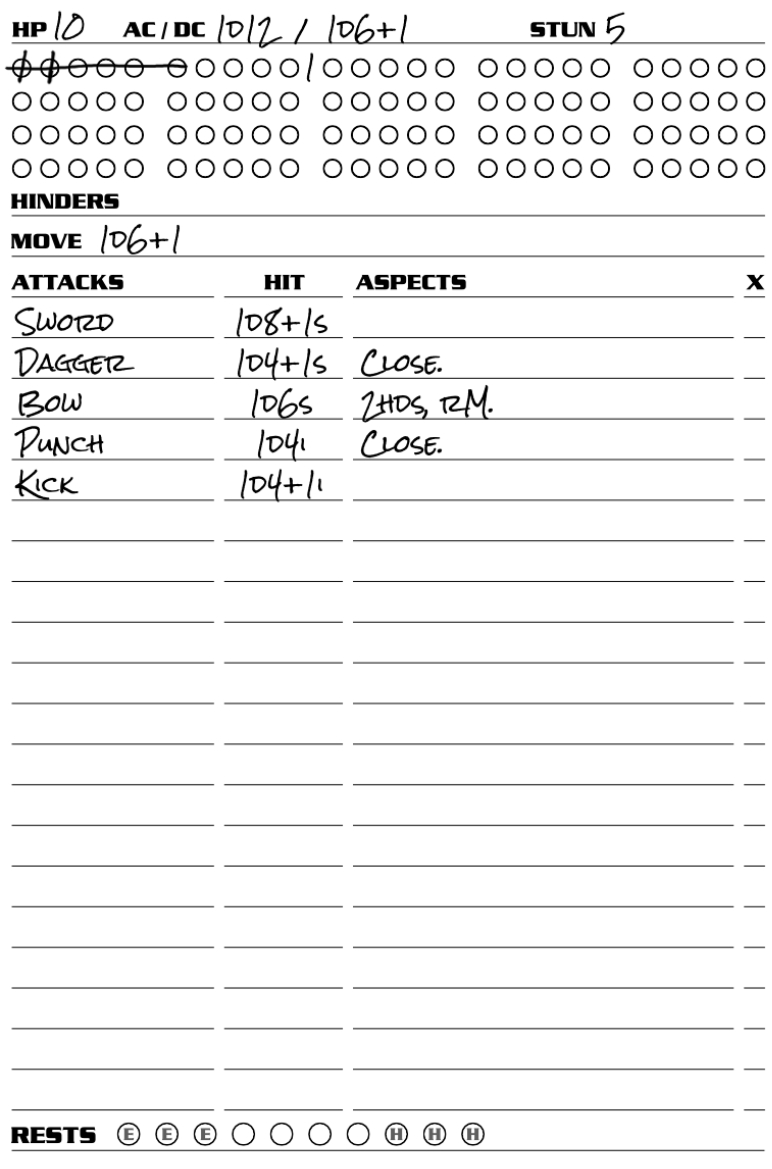
Hit Points Also known as HP, hit points tell us how much damage your character can take. Damage comes in two forms Wear and Tear. Both are recorded in the circles below your hit point count. Wear is exhaustion. Take too much of it and you pass out. Tear is physical damage. Take too much of it and you die. This is what the D in your damage circles is about. Cross the D and you are done!
Damage Damage comes with one of five damage types to help us turn wear into tear.
| Type | Ratio |
| Piercing | 1:1 |
| Sharp | 2:1 |
| Mixed | 3:1 |
| Blunt | 4:1 |
| Impact | 5:1 |
 Wear is equal to the amount of damage done. To record it draw a horizontal line through that many unworn damage circles. Tear damage depends on the wear damage. Go back to the first untorn circle and once again count out the wear damage but this time vertically strike a circle every time the ratio tells you to.
AC / DC These two protect you from being hit. AC is used against nearly everything. DC is used in surprise situations or any time you drop your guard. If there is just one number use it for both AC and DC. Otherwise the first is AC and the second is DC.
Armor Armor is a dice roll you subtract from incoming damage after you have been hit. Shields work the same way, but we keep them separate from armor since a shield only protects the front side of your character.
Stun This is what it takes for a single blow to stun your character. Which basically means you lose your next action. Take double that amount and it knocks you off your feet.
Hinders This is space for jotting down any maladies your character may be suffering from, such as Drunkenness.
Move Move is what you roll to see how many steps your character can take during combat.
Attacks This lists all the different ways in which you can attack an opponent. Hit is the modifier you use when making the attack. Dmg is the what you roll to find the damage it does. The letter beside the roll indicates its damage type (it is always the first letter of one of the five damage types). Megan's sword does 1d8+1 sharp damage. Her kick does 1d4+1 impact damage.
Aspects are tags that tell us something about the attack. Close means the attack can only be used against an opponent you are right on top of. 2hds means the attack uses two-hands. A complete list of aspects can be found in the Adventure section.
X is used with magic spells. A number there is the spell's level. When it has been X-ed out that spell is no longer available.
Rests A rest is when your character stops for a minute to catch their breath and recover some wear damage. A character can only rest ten times a day. The letters inside the circles tells us their difficulty. The first three rests are easy to make. The last three are hard. Mark them off as you use them.
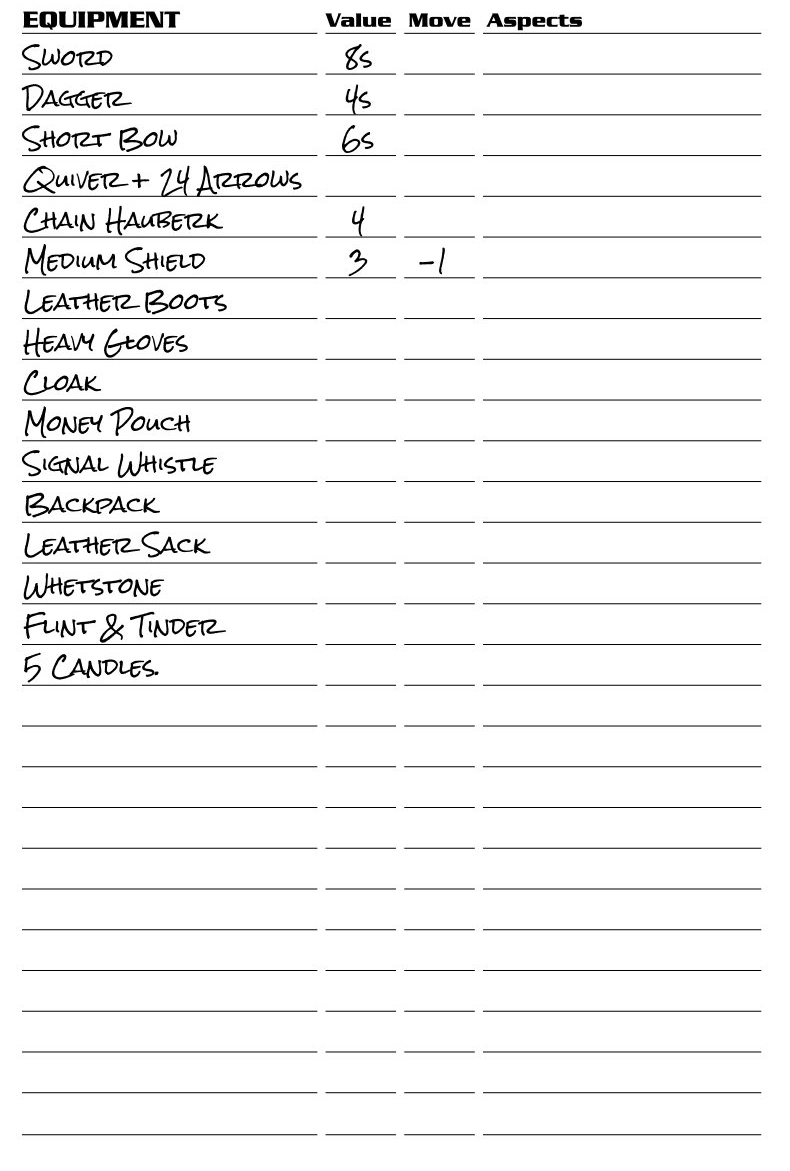
Equipment
The third page lists all the stuff your character is carrying. Def is for the defensive value of anything you have on, such as armor or shield. Move is a modifier that effects your ability to move, usually due to a heavy suit of armor or shield. Aspects is space for anything else you would like to jot down about the equipment.
Experience
The last page is primarily used to keep track of your experience points or XP. Unspent XP is what you have accumulated but have yet to spend. Spent XP lists what you have spent XP on. Total XP are the two numbers combined and determines your character level.
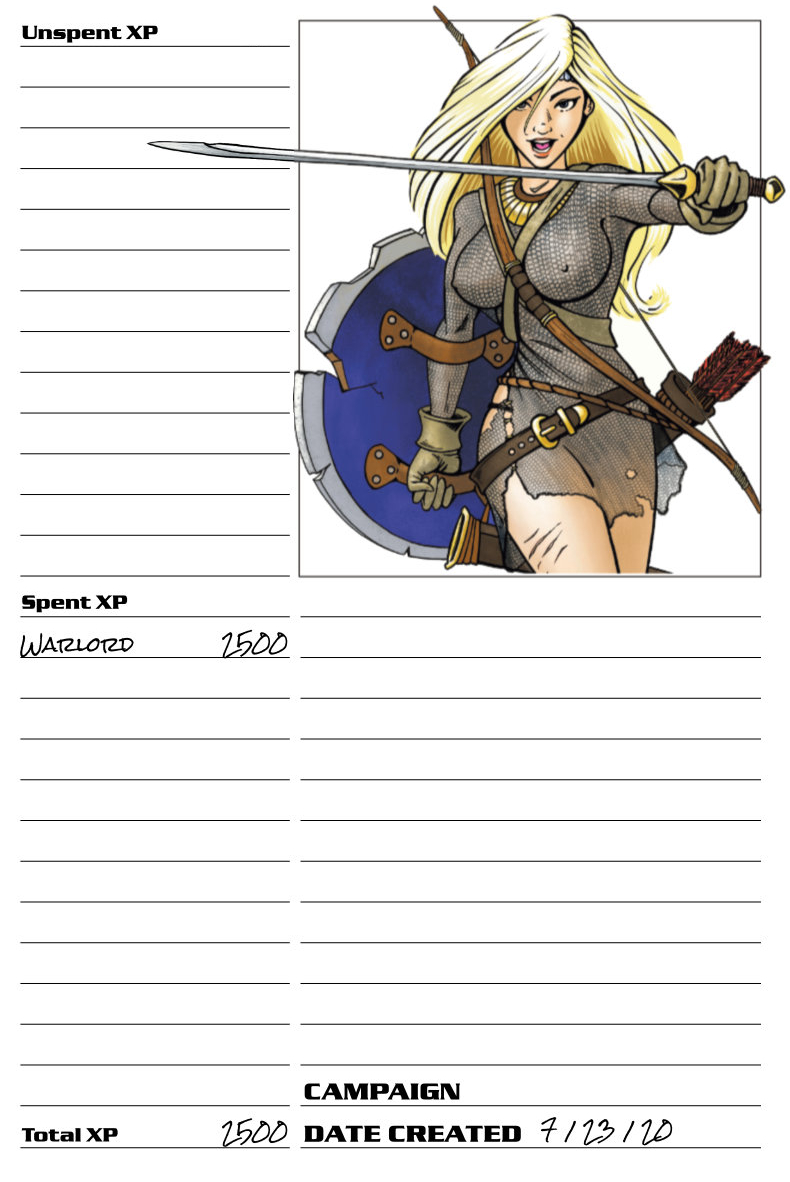
If you are artistically inclined, there is space for a picture of your character. Why the back? So you can flip the sheet up to show the rest of the table who you are currently playing.
The space below it is for anything else you would like to jot down. Campaign is the name of the campaign the character belongs in. Date Created is when you created the character.
Placemat
The character sheet pdf contains more than just a character sheet. The third page in particular is the game's Placemat, called as such because you print it out and lay it flat on the table under your character sheet.
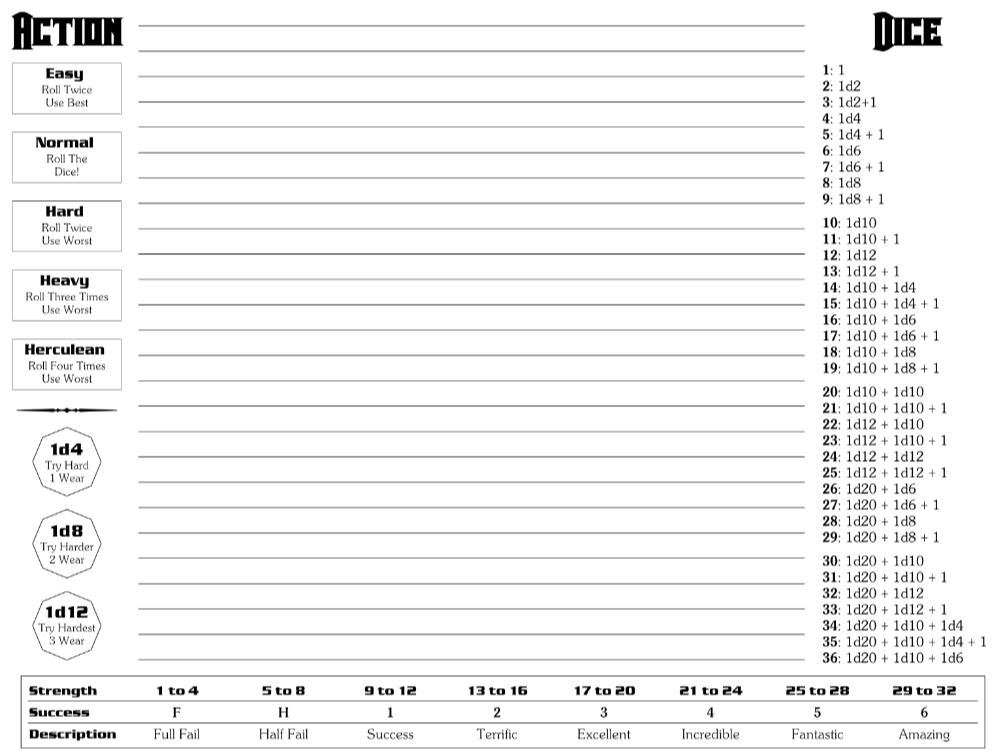
Action contains the difficulty modifiers as well as the three Try Hard options. The Success Table stretches along the bottom of the sheet. Dice contains the most commonly used part of the dice table. In the center is a lined area for notes and doodles and such.
Creation
Characters are super easy to create. For your first one follow these instructions, reading each passage and doing what needs to be done. After that you should have no problem quickly creating characters using the character creation cheat sheet in the Character Sheet pdf.
For an even faster way to create a character check out the Character Creator on this website. Otherwise, print out a character sheet, wrangle up some dice, and let's get rolling.
1.) Abilities
Roll 3d6 for each ability, straight down the line. Write them into the silver area at the bottom of each ability diamond. Any roll of 7 or less may be re-rolled but only after first re-rolling the best score you have.
Ability scores are almost never used during the game. Instead we turn them into modifiers using the table below. The modifier goes in the white area of each ability diamond. There is no upper limit to ability scores. Every additional 2 points of score creates another +1 modifier, so a score of 20 or 21 gets a +5 modifier.
| Score | Modifier |
| 18 to 19 | +4 |
| 16 to 17 | +3 |
| 14 to 15 | +2 |
| 12 to 13 | +1 |
| 10 to 11 | +0 |
| 8 to 9 | -1 |
| 6 to 7 | -2 |
| 4 to 5 | -3 |
| 2 to 3 | -4 |
2.) Class
Go through the classes and choose one. Note the Best Abilities attached to each class, if they describe your character's best abilities then that is probably a good class for you. Write down the class name and a 1 for the level you start at.
Below it jot down any features the class grants. SA stands for Starts At and is the level you get the feature at. The fighter's Eye of the Tiger has SA 3 so you won't get it until third level is reached.
Class-First Creation. If there is a certain class you want to play but the dice are not cooperating, you may opt for Class-First Creation. Choose the class first then take what the dice rolled and put the numbers where you need them. The best abilities of the Elf are Magic, Dexterity, Constitution so you would put your top three dice rolls into these abilities and distribute the rest as needed.
Skills. New characters get one language skill of their choosing at +0. Most go for Common +0 which costs 400 xp and is the most commonly spoken language around. With an Intellect of 12 or better a new character can also get Read & Write +0 which costs 600 xp. Without Read & Write you are functionally illiterate, only able to read simple things like signs and menus. With it you can read any language you can speak.
On your character sheet, beneath the class and its features, write the word Skills and list your skills and their modifiers. On the back of the sheet be sure to write down the skill names and the xp spent on them under Spent XP.
Body Sizes. Most classes have a medium body size. If you are just starting out, it is recommended that you start with a medium-sized class. Classes of other sizes (ex: Gnome, Halfling, etc) are going to require more work to get going. Read the section on Body Size before attempting to play an odd-sized character.
3.) Hit Points
Start with the best possible roll of your class hit die. Add your Muscle, Constitution and Spirit modifiers. The total is your Actual HP, meaning the actual amount of wear and tear your character can take. Should your abilities ever change your actual hp will change along with them. If this causes you to end up with less than one hit point you died during character creation. Go back to Step 1 and re-roll your character.
Actual HP = Class Hit Die + Muscle + Constitution + Spirit
Class HP is what you get from leveling up. Once for each level after first you get to roll your class hit die and add it in. Class HP is essentially plot armor. This is the damage you should have taken had not skill, moxie or good fortune intervened.
HP = Actual HP + Class HP.
Combine the two and write this down as the HP on your character sheet. In the damage circles below it, add 1 to your hit point total, count off that many circles and put a D in the circle that follows it. This tells us the limit of just how much wear and tear your character can take.
Stun Point Your stun point is your Actual HP divided by 2 with a minimum of 1.
Stun = Actual HP / 2
4.) Equipment
Each class comes with a starter pack of equipment. This is stuff you acquired on your journey to become a member of the class. All of it will be in used condition and only worth half the market value should you ever try to sell any of it.
Jot your equipment down on your sheet. You may swap out any item for another item of equal or lesser value. This helps when stylizing your character with different weapons and armor. Just be careful not to break any class restrictions against using certain kinds of weapons and armor.
Encumbrance. When it comes to how much you can carry, we go with whatever seems right. Keep in mind though that some items (notably Armor and Shield) come with a Move penalty that may slow your character's movement considerably.
Buying Equipment. Once you do acquire some treasure you will probably want to use it to buy equipment. The coin of the realm is the Iron Piece or IP and everything with a $ is in iron pieces. Other coins made of more precious metals do exist to make wealth more portable. All coins are quite big and weigh a uniform one tenth of a pound.
| Coin | Abbv | Value |
| Platinum | PP | $1000 |
| Gold | GP | $100 |
| Silver | SP | $50 |
| Copper | CP | $10 |
| Iron | IP | $1 |
5.) Attacks
Weapons should be written into your Attacks list. The name should include any quality bonus the weapon possesses as well as the number of weapons you wield. A single sword with a +1 bonus you would write in as Sword +3. For a character wielding one in each hand you would write 2 Swords +3.
Hit is the modifier used to make the attack. It comes from your character's Dexterity modifier plus any Class Bonus or Skill Bonus you may have with this kind of attack and any Hit or Quality modifier the weapon possesses.
Hit = Dexterity Mod + Class Bonus + Skill Bonus + Hit + Quality.
Classes often come with a combat line like: Melee, Ranged ½, Unarmed ½. This class would grant you the class level as a bonus with Melee attacks and half the class level with Ranged and Unarmed attacks.
Skills provide a full bonus but often with only certain weapon types such as Swords. If the weapon falls into that category you get the bonus, otherwise not.
Damage comes from the weapon itself. If the attack is muscle powered (such as a bow or sword but not a crossbow) add your Muscle modifier. Finally use the Dice Table in the character sheet pdf to turn it into a damage roll.
Aspects is space for notes on how the attack works. Most of the time this can be copied verbatim from its entry in the Creation Keeper.
6.) Defenses
Defenses come in two forms. AC/DC is a static strength that keeps you from being hit. Armor & Shield protect you after you have been hit.
AC / DC Your AC is equal to 10 plus your Dexterity modifier plus any Class or Skill bonus you have for AC. Just like an attack, if the class or skill mentions AC as a combat use, that is what you get. DC is equal to 10 plus your Luck modifier. If your DC turns out to be better than your AC use it for both of them.
AC = 10 + Dexterity Mod + Class Bonus + Skill Bonus.
DC = 10 + Luck Mod.
Armor & Shield For armor, add up anything in your equipment list which has a defensive value and use the Dice Table in the character sheet pdf to turn it into a die roll. For shields you do the same but keep the roll separate from your armor. While armor protects against attacks coming from every direction. Shields only protect the front and sides of your character. If any piece of armor or shield has a quality bonus attached to it, add that in as well.
When it comes to Armor, Helmet and Shield your character can only wear one suit of armor, one helmet and carry one shield. The same goes for any magical item that supplies some kind of defensive bonus. You get one of them. You can put a Ring of Protection on each finger of both hands but only the most powerful one will improve your defenses.
7.) Move
Classes come with movements such as the Warlord's Walk 8. The 8 is your base movement score. Add to it your Muscle and Dexterity modifiers. Subtract any Move penalties brought on by equipment. Turn the total into a die roll using the Die Table. If you end up with a 1 or less your movement is a 1.
Move = Class Move + Muscle Mod + Dexterity Mod - Move Penalty.
If your class mentions any other forms of movement, such as Swim or Fly, treat these just like Walk and write them down as a die rolls on your character sheet.
8.) Magic
Classes that let characters use magic have a Magic entry similar to Combat. It first tells us the system the class uses (Spell-Caster, Divine-Caster or Power-User) and follows it with the different kinds of spells a character can cast (Conjuration, Illusion, Psionic, etc). When a ½ has been tacked onto a kind the character only gets half a class bonus with it, otherwise they get a full class bonus. Any isn't a kind of magic, it means any kind of magic that isn't divine. Divine spells can only be cast by divine-casters.
Elves have Magic: Power-User, Any ½, Nature. This means an elven character is a power-user who can cast any non-divine spell with a half class bonus. Nature spells get a full class bonus.
Spell Level Limit All spells come with a level from 1 to 9 to show us just how big and powerful it is. The number of spell levels you can have ready to cast — aka your Spell Level Limit — is your Class Level plus an ability modifier that depends on the magic system:
Spell-Casters = Intellect
Divine-Casters = Spirit
Power-Users = Constitution
Elves are power users so a 1st level elf with Constitution +2 can memorize three levels worth of magic. That could be three first level spells, a first and a second level spell, or even a single third level spell. Any combination that adds up to three.
Start At Certain classes get the ability to cast spells on reaching a certain level. This will change their spell level limit. Subtract from it the level at which the magic starts and add 1.
Spell Level Limit = Spell Level Limit - Starts At Level + 1.
Spell Hit Spells should be written into Attacks like weapons. To find a spell's hit modifier add your Magic Mod to your Class Bonus (adjusted for kind) and subtract the Spell Level. If you have any skills the specialize in the casting of a certain kind of magic, add that in when it applies
Hit = Magic Mod + Class Bonus + Skill Bonus - Spell Level.
If the spell does damage, write that in as a die roll under DMG. Unlike weapon attacks, ability modifiers do not effect the damage that a spell does. Copy any Aspects the spell has in its description. Be sure to write the spell's level under X. You can cast a spell over and over until you fully fail at casting it. At that point you forget the spell and should X out its level to show it is gone. Once you recover the spell, erase the X and replace it with the spell level.
Spell-Casters Spell-casters gain spells by studying arcane tomes called spellbooks. When you forget a spell, it takes 1 hour per spell level spent studying your spellbook to get it back. Spells may be intentionally forgotten and replaced with other spells in this fashion.
Newly created spell-casters get a spellbook containing as many spells as they can memorize. After that, while their spell level limit may go up, they do not gain any new spells. New spells they need to acquire while out adventuring.
Lose your spellbook and you lose the keys to magical power. Eventually, all of your spells will be forgotten. Guard your spellbook with your life!
Divine-Casters Divine-casters pray for the spells they need and the divine forces deliver. Like a spell-caster it takes 1 hour per spell level to either recover a forgotten spell or swap out an old one for a new one.
One big advantage of being a divine-caster is that they don't need spellbooks. They can pray for any spell they are allowed to cast and they will get it.
A big disadvantage is that divine-casters must be aligned with a true inclination that ends in Good or Evil. The use of their powers are constantly being monitored and they will fail should the character knowingly attempt to help someone of the opposite alignment or harm someone of the same alignment. Anyone with a Neutral alignment is fair game.
Power-Users While the terms Spell and Power are largely interchangeable, power-users are not casters! They often have no clue as to why they can do what they do or how to learn to do more. It just happens. While spell and divine casters are relatively rare, power-users make up that broad swath of beings with magical powers.
When a power-user levels up the class that supplies their powers, their player gets to choose for them as many powers as their spell level limit allows. They may even dump some old powers to make room for new ones.
The catch is that power-users can only change their powers when they level up. What you choose may be with that character for a very long time, so choose wisely.
Like a caster, a power-user will forget a power when they fully fail to cast it. The spell gets scrambled in their head. It takes 1 hour per spell level spent sleeping or meditating to unscramble it.
9.) Personality
Characters often come with two inclinations, the first is their Social Inclination. If their class lists a number of Inclinations then it should be one of them. Character classes often represent cultures and can be quite fickle as to what they will tolerate.
The second inclination is the character's True Inclination. This is who they truly are and it can be any of the nine inclinations. On your sheet, if the two inclinations are different from one another, separate them with a slash Social / True.
| LG = Lawful Good |
| NG = Neutral Good |
| CG = Chaotic Good |
| LN = Lawful Neutral |
| TN = True Neutral |
| CN = Chaotic Neutral |
| LE = Lawful Evil |
| NE = Neutral Evil |
| CE = Chaotic Evil |
Traits Characters, especially low-level ones, come with no guarantee that they will survive. For this reason we don't bother with backgrounds. That is something you can fill in later. For now choose three personality traits, one positive, one neutral and one negative. Write them in on your sheet next to your inclination. Personality traits are merely suggestions.
Name Lastly your character needs a name. If you can't think of anything tack a — The — onto the character's class. Your barbarian becomes The Barbarian, at least until you can think of something better.
Advancement
A big part of the game revolves around acquiring experience points and leveling up. Because this often involves making many changes to your character we don't do it while the game is in session. Wait until the end of the night when everyone is starting to pack up and go home. That is the time to advance your character. Someone should be there to bare witness to any dice rolls you make, but you don't need an audience when levelling up.
Increasing Classes You may increase the level of a class as soon as you have the XP to do so. A class's Level Advancement table tells us what you need to reach a certain level. If the table says:
1 = 2,500
2 = 5,000
3 = 10,000
It takes 10,000 xp total to reach 3rd level (as opposed to 2,500 to reach 1st another 5,000 to reach 2nd and another 10,000 to reach 3rd which totals 17,500 xp). Be sure to increase the amount you spend on a class on the back of your sheet under Spent XP.
Increasing Skills Skills advance in a similar fashion except skills always start at +0 for an XP amount that doubles with every +1 you add to it.
It takes 400 xp to acquire the language Common with a +0 bonus (aka zero level). Common +1 will cost you 800 xp total. Common +2 costs 1600 xp total, and so on. Be sure to write the skill and the total spent on it under Spent XP.
Increasing Abilities Ability scores are not fixed in stone. You may increase your scores using the following table:
| Bonus | XP |
| +1 | 1,000 |
| +2 | 2,000 |
| +3 | 4,000 |
| +4 | 8,000 |
| +5 | 16,000 |
| +6 | 32,000 |
On the back of your sheet write down the total XP spent on each ability. If you increased your Intellect by +1 and then +2 at some other time, that's a +3 increase. You would write down Intellect +3: 4,000 under Spent XP.
While the table above only goes up to +6, like skills and classes there is no limit on how far you can take an ability. The cost in XP doubles with each additional point. A +7 costs 64,000 points. A +8 costs 128,000 points, and so on.
Character Level Character level is a number that gives us a general idea of how powerful your character is. Add up everything you have spent XP on and find your place in this table:
| Level | Ends at XP |
| 1st | 2,500 |
| 2nd | 5,000 |
| 3rd | 10,000 |
| 4th | 20,000 |
| 5th | 40,000 |
| 6th | 80,000 |
| 7th | 160,000 |
| 8th | 320,000 |
| 9th | 640,000 |
| 10th | 1,280,000 |
Traditionally, all characters start with a single class at 1st level, one language skill and no ability increases. Depending on how all of this adds up you might start with a character level other than first.
When making a new character to take on an adventure with a set range of levels you should start at the lowest level of that range. If the adventure recommends levels 4 to 6 you should start at 4th level with a budget of 20,000 xp. Go back and increase your class, skills or ability scores to meet it but don't go over budget.
Gaining XP There are two main ways of gaining experience points in the game. The first is through your class. This is described by the class and more often then not involves exchanging treasure for XP. Often called Class Points, the catch is that you can only spend them on the class that gave them to you. While you might be able to justify spending them on an ability or skill that benefits the class, a multi-classed Fighter / Wizard could not spend XP gained as a Fighter on becoming a better Wizard.
The second way is through recovering wear damage. These are often known as Effort Points and can be spent on anything. While out on adventure, when the stakes are high, you gain 10 XP for every 1 point of wear damage you recover. Just as long as you remember to do this. The DM won't do it for you. While not on adventure, the experience of day to day life only grants 1 XP per point of wear damage. Work, exercise and sparring may help improve your character, but it doesn't do nearly as much as battling creatures that are eager to eat you.
Losing XP This doesn't happen often but every now and then you will lose experience points. Instead of rolling back your level and wasting time rebuilding your character, xp loss eats into your Unspent XP, eventually saddling you with a deficit of experience points.
So if you have 500 unspent points and lose 2000 xp that will leave you with -1500 unspent points, all of which you need to regain before you can advance your character again. Both class and effort points can be used to pay off a deficit.
Dropping Classes & Skills While it is almost never done, you may drop a calling or skill you no longer use, but you do not gain back the experience points that went into them. Those points vanish.
Races cannot be dropped, which means that a human character will always need to hold onto at least one calling. Transformations cannot be dropped but the transformation itself may come with some special way for a character to rid themselves of it. Once that happens any xp which went into the class disappears.
Multi-Classing
You may give your character up to three callings if human, or a race and two callings if not. However, there are a few stipulations that need to be heeded when multi-classing:
It Needs to Make Sense. Do not combine incompatible classes. Wizards and Warlocks hate each other with a passion. You would be very hard pressed to find a Wizard/Warlock without an extremely good reason for it. Callings in particular often represent highly defined cultures that can be quite finicky about who they will take in as one of their own. Ask your DM.
It Takes Time. It takes at least 3d6 months of in-game time for a character to become 1st level in a class. Think of this as time spent learning the new class. During this time you will spend XP on the class so you reach first level just as the time period ends.
Class Bonuses. Class bonuses do not combine. You get the best of what your classes provide. Should Cleric give you Melee +1 and Fighter give you Melee +2 you get the +2. They do not create Melee +3.
Arms & Armor. The most restrictive requirements apply. Wizards may not wear anything heavier than light armor. A Fighter/Wizard should do the same. This applies to any restriction a class puts on a character. If one class doesn't allow it, you don't get it.
Free Equipment. If the new class supplies something your old class does not then you get it, providing you have a use for it. There is no point in giving a Fighter/Wizard free armor if they are never going to wear it.
Hit Points & Movement. You only gain Actual Hit Points from your first class. Class HP will be gained from your second or third class, staring with a roll of its hit die at first level.
The same goes for the movement provided by classes. You only gain movement from your first class, unless the other classes are providing something unique like the Medusa sprouting wings at 4th level and gaining the ability to fly.
Transformations Are Different. You may have any number of transformations and they all start on the day of your transformation at zero level with 0 XP. At zero level you don't gain a class bonus or any beneficial talents or powers but you do have to deal with any troubles the class brings.
With transformations, something needs to happen during the game to explain the transformation. You can't simply wake up one day and decide to be a vampire.
No Sharing XP. The experience points gained through a class can only be spent on that class. You may not spend them on your other classes, no matter what kind of class it is.
Action
The game begins. The DM tells you what kind of a mess your characters have gotten themselves into and you — the Dragonhead Bangers — carry it forward from there. You tell the DM what your characters are doing. You sneak down the corridor. You look around the crypt. You try to decipher the glyphs on a stone sarcophagus.
If all of it sounds doable you just do it and the DM describes what happens next. Otherwise, when uncertainty rears its ugly head, the DM will ask you for a check, saying something along the lines of "hmm, give me a Hard Dexterity check."
Ability Every check begins with one of the nine abilities chosen by the DM for how well it fits the situation at hand. With this check we are testing your character's Dexterity to see how agile they are. Start with your ability modifier.
Difficulty The Hard part of that check is its difficulty. This is a gut decision made by the DM about how challenging the check seems. It tells us the number of times we will roll the dice.
| Easy | = Roll Twice, Use Better. |
| Normal | = Roll Once. |
| Hard | = Roll Twice, Use Worse. |
| Heavy | = Roll Three Times, Use Worse. |
| Herculean | = Roll Four Times, Use Worse. |
| Impossible | = It cannot be done. |
Difficulty is a ladder of sorts. If a check is described as Easy, Hard, Heavy, Herculean or Impossible that is where you start. When nothing is mentioned it is a Normal check. If something hardens the check that will move it down a rung. An Easy check becomes Normal, or a Normal check becomes Hard. No check can be made harder than Impossible or easier than Easy.
Class Bonus If what you are doing seems like something your class should help you with — mention it — should the DM agree you get to add your class level to the score as a Class Bonus. Should the DM only somewhat agree you get half the class level. When the DM disagrees you get nothing.
Skill Bonus Skills work just like classes. If it seems like a skill should help then you get its full bonus. If it is only somewhat helpful you get half its bonus. You can only use one skill at a time, so if you have two or three skills that seem like they should help? Go with the one giving you the best modifier.
Other Modifiers Most checks boil down to — Ability + Class Bonus + Skill Bonus — and that's it. If you have any other modifiers which might effect the check, add them in. This is your last chance. Once you roll the dice you may not change your modifiers!
Strength & Success Roll the d20. Add your modifier to it. The total is the Strength of your action. Strength is a measure of performance. It uses the table below to tell us just how successful you were.
| Strength | Success |
| 21 to 24 | Triple |
| 17 to 20 | Double |
| 13 to 16 | Single |
| 9 to 12 | Half Fail |
| 5 to 8 | Full Fail |
| 1 to 4 | Crash Fail |
A sure-fire success happens with a 13 or better. Often a single success is all you need. Doubles and triples are there for special occasions. Although this table stops at 24, every four points above 24 is another success with no upper limit.
A 9 to 12 is a half-fail which is also a half-success. You almost made it. If you were jumping a crevasse a half-fail would leave you dangling by your fingertips on the other side. A 5 to 8 is a full fail and will definitely send you plummeting into the crevasse. Any strength of 4 or less is a crash fail and the worst thing that could possibly happen. Not only do you plummet into the crevasse but you miss the river at its bottom to land on some jagged rocks. What actually happens is left up to the DM, or possibly a roll on one of the game's many crash tables.
Snake-Eyes When every die rolls a 1? That's Snake-Eyes. It doesn't matter what you have for modifiers you automatically crash. Mojos cannot be used to fudge a snake-eyed roll.
Action Tables Most of the time we leave it to the DM to interpret the outcome of an action, but there are also Action Tables peppered about the game like this one which is used for climbing.
| Dexterity | |
| 1: | You made it! |
| H: | Almost. Make the check again. |
| F: | Fall from half way up. |
| C: | Fall from all the way up. |
Dexterity is the ability to check. Numbered entries are successes. There is no 2 or 3 because all you need is a single success to make the climb. Lettered entries are failures. An H is a half fail. In this case you need to make the check again. An F is a full fail. With a 40 foot climb you would take a twenty foot fall. A C is a crash fail. With a 40 foot climb you reach the very top before falling the entire forty feet. Damn you snake-eyes! Damn you!!!
Try Hard Characters are always trying to get things done but sometimes they need to try harder. Collectively known as Try Hard, this trades wear damage for an extra die to roll.
| Level | Damage | Extra Die |
| Try Hard | 1 wear | +1d4 |
| Try Harder | 2 wear | +1d8 |
| Try Hardest | 3 wear | +1d12 |
Tell the table how hard you are trying, mark down the damage and add the die to your d20 roll. If the wear damage is enough to knock you unconscious, that happens immediately after you make the check. Even when you are down to your last hit point you may valiantly try your hardest and pass out afterward.
You may try hard once per check with anything except a Saving Throw or DC roll. All dice should be rolled at once. Sorry, no making a normal roll and then deciding if you want to try hard or not.
Saving Throws A saving throw is a test of character. It doesn't represent anything you actually do. More often than not you are making it because of something being done to you. The main way it differs from a normal check is that you cannot Try Hard with it.
When struck by a poison dart a Constitution Save determines whether you live or die. You cannot try hard to oppose the poison. Because making a save is nothing you actually do, you can make a dozen of them all at once and still have time left over to do something else. Let's just hope you never have to.
Challenges A challenge pits the strength of your check against another strength. These are often expressed with a Vs between the offensive and defensive sides of the challenge. Magic Vs Spirit, Hard Intellect Vs Wisdom, Constitution Vs 13 are all different kinds of challenges.
To break down a door make a Muscle Vs Break challenge where Break is the strength of the door. Against a Break 12 you need to roll a 12 or better. But! A 12 vs 12 is a stalemate. Tied strengths need to be broken. To break a tie, roll any die. An even roll beats the strength. An odd roll did not.
When success matters, winning the challenge grants you one success and then another for every four points of difference between the two strengths. Combat is a Hit Vs AC challenge. If you make an attack with a 20 vs 15 that's a 5 point difference and two successes, one for winning it and another for at least 4 points of difference. In combat a double success does double damage!
When you fail to beat the defensive strength — that is a Defeat — this isn't the same thing as failing your check for which there may be consequences. With a defeat, nothing happens.
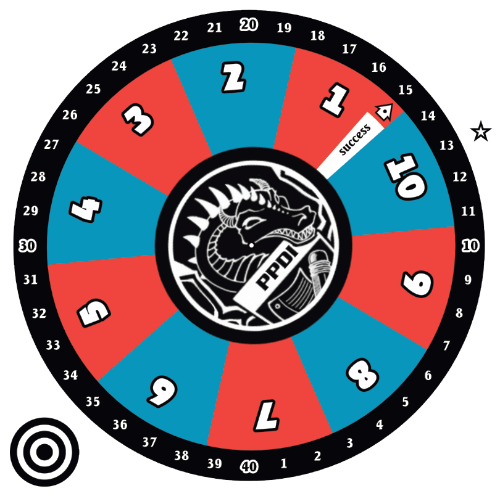
While it is not hard to figure out the success of a challenge, doing so can get tedious after a while. Be sure to download the game's Challenge Wheel. Once assembled it should look like the picture above. Basically you spin the dial to point at the defensive strength. Roll the dice and find the offensive strength on the black ring. The colored wedge it falls under tells you its success.
Turn the dial to point at 13 and it turns into the success table. The 10 wedge is a half fail, the 9 wedge is a full fail, and the 8 wedge is a crash fail.
Competitions With a competition you aren't trying to beat the other guy's strength so much as create the best strength possible. If you have ten characters running in a race, they would all make a Move roll and whoever produces the greatest strength wins it. When winners tie for first place, they should each roll 1d100. Whoever rolls the largest number wins by a hair.
With teams of characters competing (as in a tug-o-war) forget strength values and focus on success. Every character should make the same check, trying hard when desired. Tally up the number of successes rolled. A full fail removes one success from the total. A crash removes two. In the end, the team with the greatest number of successes wins the competition.
Dice Mechanics Currently you are using the d20 dice mechanic. On the good side it is the most well-known dice mechanic out there, so you probably won't have to explain how it works to every new player at your table. On the not-so-good side it can produce some pretty wonky results and it is not the fastest game we offer (see Realistic Rolls in Options for our fix for this).
One of the neat parts of keeping the rules online is that you can change this! Click the Settings button in the toolbar and you can change a number of different things about the game rules. Not only will they be updated here but they will change every program in the Dragonhead system.
The only drawback to this is that you now need to talk it over with your gaming group and get them to use the same rules settings when they go to look at the site. While you can actually play with everyone using a different variation of the rules, the game plays best when everyone is on the same page.
Dungeons
A dungeon is any enclosed area — a decrepit castle, lost caverns, a haunted forest — where you might not want to linger for too long. In the days of yore, someone in the party would be designated the party Mapper and given a pad of graph paper to draw out a map of the dungeon on. A large chunk of the game was spent listening to the DM tell the mapper what to draw as the party wormed its way through the dungeon corridors.
This put the crawl into Dungeon Crawling.
Ghost Maps To keep the game moving, Dragonhead uses Ghost Maps which are skeletal copies of the maps that the DM uses but with all the secret stuff erased. Ghost maps are disposable! They are made to be drawn on. A ghost map will give you the general layout of the dungeon but you won't actually know what lies within until you go there.
Marching Order The first thing you should do is establish a marching order to show who is in front, who is in the middle and who is guarding the rear of the group. Use miniatures if you have them. Otherwise write the character's names down on a sheet of scrap paper to show their arrangement.
Movement Speed Pick an entrance to the dungeon on the ghost map and mark its square. A square represents a 10 x 10 feet of space and is usually big enough for the entire party to fit inside. Next choose the speed the party will travel at: Slow, Medium or Fast.
| Speed | Squares | Ramifications |
| Slow | Move x 1 | Searching or Hiding is Possible. |
| Medium | Move x 2 | No Searching or Hiding. |
| Fast | Move x 4 | Double Random Encounter Roll. |
Dungeon exploration moves in Crawls, each of which is one minute long. At the start of a crawl the slowest party member should make a Move roll to see how many squares the party can move.
Slow speed is what you use when searching an area or trying to find a place to hide. What the dice rolls is the number of squares you move.
Medium speed doubles the move roll. This is the party trying to move as fast as they can while still moving quietly. No searching or hiding is possible.
Fast speed quadruples the move roll. This is the party high-tailing it through the dungeon. Because fast travel makes a ton of noise, the DM will roll twice on the random encounter table and use the lower of the two rolls to see if you encounter anything. With random encounters you do not want the DM rolling low.
Tracing A Path The mapper uses a pencil to trace a line through the squares on the ghost map, keeping track of where the party has been. It takes two squares of movement to move diagonally. Draw a circle in the square where the crawl comes to an end.
Random Encounters At the end of each crawl the DM rolls on the dungeon's random encounter table to see if anything happens. Random encounter tables vary from place to place but they all come with the possibility of nothing happening, so you won't always encounter something every time the dice are rolled.
When something does happen and it isn't obvious where the encounter is coming from the mapper should roll 1d8 with the following table. Roll 1d4 when left and right are not options. Roll 1d6 at a t-intersection and turn Before into Right.
| Roll | Direction |
| 1 to 2 | Behind |
| 3 to 4 | Before |
| 5 to 6 | Left |
| 7 to 8 | Right |
Light How far away the encounter is depends on your light source. The Light aspect tells us the number of squares a light source illuminates outside of the square it is in. Random encounters appear inside that last square of light. Torches have Light 3, so a random encounter will appear three squares away from a party travelling by torchlight. Candles have Light 1, so a random encounter will appear in the square adjacent to the one the party is in.
If the party has no light source then the creature will hit them with a surprise attack (no wisdom checks necessary). In a lighted area, or with a party that can see in the dark, roll 2d6 to find the distance in squares. Subtract 2 when approached from Behind. Add 2 when approached from Before.
No matter what happens, after the encounter is over the mapper should mark the circle where the last crawl ended with an X and start drawing out a new crawl from a square adjacent to it.
Rooms Room encounters are planned encounters marked on the DM's map but left off the ghost map. Stumble into one and it happens, just like a random encounter, bringing your crawl to an untimely end. Mark that square with a circle and handle it. Once done, X out the circle and start a new crawl.
This assumes you are returning to the square where the previous crawl ended. If this is not the case, simply start crawling from wherever you are on the ghost map at the time you decided to start crawling again.
Searching You can only search an area while moving through it at slow speed. Everyone should make a Wisdom check, if anyone can beat the strength of something hidden in that area they spot it.
So when a secret door has been hidden with a strength of 13 anyone who can beat a 13 will spot it. Focusing your search by describing how you are searching, where you are searching or what it is you are searching for will usually make the check easier.
Traps Traps are mechanical devices designed to make characters regret their life choices. They will often be hidden with a secret strength that needs to be beaten while searching the area to detect it. When that happens the party can avoid the trap or intentionally set it off to disable it.
When the party doesn't find a trap, everyone should make a Luck Save. Whoever fails with the worst strength will be hit by it. Roll to hit the character's DC. If the trap succeeds it will damage the character just like a surprise attack from a creature.
With pit traps, anyone fully failing the Luck Save falls into the pit. Anyone who half fails will catch themselves on the pit's edge but now be dangling there, hanging on by their fingertips. They need to make a Muscle check to pull themselves up and out. It takes a hard muscle check to help someone up, adding your muscle strength to their own. Pit traps do falling damage determined by their depth and what is at the bottom of the pit (see Falling in Adventure).
No matter what kind of trap it is, when everyone makes their Luck Save the trap was somehow missed and remains undetected, liable to catch them again the next time they move through the area.
Hiding At the end of a crawl you can hide from a possible encounter, but only if you moved at slow speed during the crawl and told the DM you were looking for a place to hide. You cannot hide and search an area at the same time. It's one or the other.
Everyone should make a Wisdom check to find the strength at which they hid themselves. How much stuff there is to hide behind and describing how you are hiding may change the difficulty of the check.
Creatures in a random encounter should be given the chance to spot hiding characters by making a Wisdom check. If none can beat the character's hide strengths they won't notice them. The party may launch a surprise attack or let the creatures wander on by.
If the monsters notice the characters they may attack or intentionally decide to leave, possibly to go set an ambush of their own or run to gather reinforcements. While checks are often rolled out in the open, you should never know what the other party has rolled until it's too late.
Doors Doors often come with a number of stats in parenthesis, such as: Hidden Locked Door (secret 12, break 15, locked 13, hear 10). Typically one such door is used by the entire dungeon and exceptions to it are noted where they happen.
| Secret | = beat with Wisdom to discover the door. |
| Break | = beat with Muscle to break down the door. |
| Locked | = beat with Dexterity to pick its lock. |
| Hear | = beat with Wisdom to listen through it. |
Up to two characters can combine forces when it comes to breaking down a door but both make Hard Muscle checks to do so. With a battering ram up to six characters can combine forces in this way.
Lockpicks are required to pick the lock on a door. Anyone who purchased the picks should know how to use them. Anyone who just found the picks somewhere will not. Characters wearing helmets might want to take them off as it makes hearing through a door harder to do.
Resting To take a rest you need to hold up in a secure location and spend a crawl doing nothing but catching your breath. The DM will roll for a random encounter. If something happens then your rest has been interrupted. If nothing happens, each character should make a Constitution Save and recover 1d6 in wear damage per success.
When you do get to rest, be sure to mark it as a rest taken on your character sheet. The first three rests will be easy ones. The last three are hard ones. You can only take up to ten rests per day. You also gain experience points to the tune of 10 XP per 1 Wear recovered.
Combat
Combat is action constrained by time. It moves in rounds, each of which is just three seconds long. In it your character can make one action — one thing you want to do — which can be anything we can imagine the character doing in three seconds or less. Most of the time this boils down to Move and Attack. First though, we need to figure out who goes first.
Initiative When a fight breaks out roll 1d6 for Initiative. Roll even and the characters win it. Roll odd and the creatures do.
When the characters win the player sitting to the DM's left goes first and the game circles clockwise around the table with each player making their character's entire action for the round before the next player gets to go. The round ends with the DM's creatures retaliating against the characters.
When the creatures win, the same thing happens except now the DM's creatures begin the round and the player sitting to the DM's right ends it. Initiative should be re-rolled at the start of each round.
Move When not using miniatures, tell the DM where you want to go and who you want to attack. Most of the time you just go there. Otherwise the DM will ask you for a Move roll. The greater you roll the more likely you will be to get to where you are going.
Attack You get 1 Attack per weapon or appendage per round. If all you have is a sword you get one attack with it. A sword and shield will likewise give you just one sword attack (your shield will be busy defending). A sword in each hand gives you two attacks, one with each weapon. A two-handed weapon gives you just one attack.
| What You Have | Number of Attacks |
| One Weapon | 1 |
| Weapon & Shield | 1 |
| Weapon in Each Hand | 2 |
| Two-Handed Weapon | 1 |
You can use your attack to do other things, such as sheath a weapon, draw a different weapon, remove a helmet, etc, but you can only do one thing per appendage. Draw a sword and that is your attack for the round. You cannot attack with the sword until the next round.
Hit Vs AC To make the attack roll its Hit modifier and compare this strength to your opponent's AC or DC when you have caught them by surprise. Succeed and you roll for damage, once for each success. Land three successes and you would roll for damage three times, adding it all together to form one massive blow.
Tell the table the total damage done and be sure to include the attack's damage type, saying something like "Sixteen Sharp" for an attack doing sixteen points of sharp damage. Damage type is indicated by the letter beside the damage roll. Forget to mention this and the attack does all wear and no tear.
| Letter | Damage Type | Ratio |
| p | Piercing | 1:1 |
| s | Sharp | 2:1 |
| m | Mixed | 3:1 |
| b | Blunt | 4:1 |
| i | Impact | 5:1 |
Defend After being hit by an attack, roll your Armor and subtract it from the incoming damage. If this reduces the attack to zero you take no damage. Otherwise you take the remainder.
If you have a Shield you should roll it along with your armor but only against attacks coming at the front or sides of your character. Shields do not protect your back.
You may not try hard with an armor or shield roll or a DC roll. You can try hard with your AC but only against one attack at a time.
Damage Any damage that breeches your armor should be taken as wear and tear. All damage is taken as wear damage. Damage type tells us how many points of wear it takes to do one point of tear damage. An attack doing 16 Sharp would do 16 wear and 8 tear.
Attacks bearing the Scar aspect do scar damage. Instead of striking out torn circles you blacken them in. Scar damage does not heal naturally.
Stunned Last but not least, when a single blow does your stun point or more in wear damage you lose your next immediate action to the shock of being hit. This could mean your action in this round if you have yet to go or the next round if you have already gone.
A stunned character trying to cast a spell will lose it. When grappling someone or desperately holding onto something you let go. A climbing or flying character plummets to the ground.
Take double your stun point or more and your character is knocked flat. Now you lose one action to being stunned and need to waste another action standing back up. While you can make actions flat on your back, they will be hard ones to make. Defending against attacks uses DC.
On your character sheet mark a stun with an S next to your stun point. Mark a knock down with a K. Erase these letters as actions are spent recovering from them.
Magic Spell-casters and divine-casters can only cast one spell as their attack for the round. They need to use both hands and make a vocalization. Any caster unable to do that cannot cast a spell. Anyone using a magic item with spell-like powers has the same restrictions. Power-users do not have any such restrictions but only one power can be used per round as their attack.
If a spell or a magic item has a Time aspect that is the number of rounds it takes to use it. Potions have Time 3 so it takes three rounds to open the bottle, guzzle it down, and be enchanted by the potion's effects. You may move around while doing this but you cannot attack.
Spells designed to do damage work just like weapons with a Hit vs AC challenge. Those spells not designed to do damage will often have a Save ability as an aspect. Whoever is hit by the spell should make a saving throw of that ability. If it can defeat the spell's strength the spell has no effect on them. Similar to this is the Def ability aspect. This works the same way as Save except you may try hard with the check. When successes matter, consider this a challenge pitting Magic vs Save or Def.
No matter what a spell does, when you fully fail to cast it you forget it. X the spell from your attacks list. It can no longer be used until you spend some time (1 hour per spell level) recovering it. Crashing a spell does all of this as well as a roll on the Spell Crash table to see what happens next.
Encounters An Encounter is a very flexible length of time lasting as long as combat does or ten minutes, whichever comes first. In truth, most fights are not going to last one minute, let alone ten of them (that's 200 rounds!) When a spell says it lasts for one encounter? That means it will last as long as you need it to or until the encounter is over.
A dungeon crawl lasts for one minute and is often considered one encounter long. In practice it is a little bit shorter than that. Any magic cast while dungeon crawling will last into the random or room encounter that ends the crawl.
So if you cast invisibility on yourself while crawling through the dungeon your invisibility will not suddenly end once you enter a room. It will, however, end right after you are done handling whatever encounter is in that room. Should the room prove to be empty you will need to cast the spell again to remain invisible as you enter a new crawl.
Minatures
You do not need miniatures to play Dragonhead but they do come in handy, especially with combat. Here are a few things you might want to have on hand before getting started:
- Miniatures — Paper, Plastic or Metal. One for each character and creature involved.
- A Vinyl Battle Mat — Covered in 1-inch squares, designed to be drawn on using dry erasable markers.
- Dry Erasable Markers — Do not use permanent markers. Sharpies are forever!
- Paper Towels — For cleaning the mat after a battle.
- A Small Tape Measure — For quickly measuring distances.
- A Mini-Mag Light — For lighting up areas.
Now, when a fight breaks out, the DM should quickly sketch the area onto the battle mat. Each square is known as a Step and roughly equivalent to a yard or meter for the characters involved. Nine steps fit inside each 10' square on the ghost map.
Find where the party should be according to the ghost map and arrange their miniatures according to their marching order on the battle mat. Each mini should occupy a separate step.
Move Now, when you make a move roll it tells us the number of steps you can take that round. You don't have to take every step you roll but that is the most you can move. Running is an option. You get to roll twice and add the die rolls together but doing so will harden any check you make during that round.
When it comes to moving your miniature, you cannot move through a step occupied by another character or creature. It takes two steps to move diagonally. You may pivot up to 90 degrees without problem. Every turn of 90 degrees more than that will cost you another step of movement.
Melee Attacks A melee attack can hit anyone you passed while moving about. This means your opponent needs to have been within reach of a step you once occupied. Normal attacks can reach into an adjacent step, including diagonally. Close attacks can only attack into a non-diagonal adjacent step. Reach weapons can reach over an adjacent step to make an attack. If an attack has Reach with a number, such as Reach 2, this is the number of steps it can reach over.
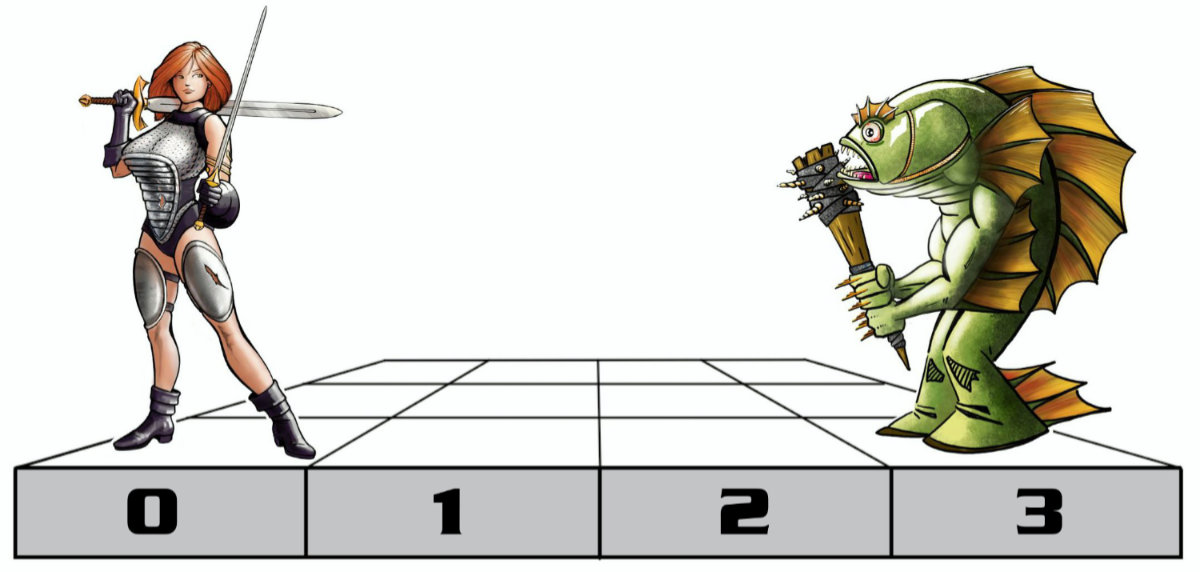
In the example above, Carmin is in step 0 and adjacent to step 1. She could attack into it with her swords, but she cannot reach the Troglodyte in step 3. Had she brought a spear bearing the Reach aspect, she could reach over step 1 and attack step 2 but still not reach the Trog. Halberds have Reach 2. Using one of those she could finally reach over steps 1 and 2 to attack the Trog.
The problem with Reach weapons is that they suck up close. Any target inside of the reach of your weapon will be a hard target to hit. So if Carmin were using a halberd against the Troglodyte and the creature moved into step 2 or step 1 that would put it too close to her and make it a hard target to hit.
Ranged Attacks In most dungeon rooms, a ranged weapon (such as a crossbow or bow) can attack anyone just as long as you can draw a clear line of sight between your character and the target. Anyone standing in the way should make a Luck Save. If it succeeds the shot barely misses them. If it fails they will be hit instead of the target.
Outside, distances tend to be longer and can make a significant difference. When measuring distances use a tape measure where 1 inch = 1 step. Ranged weapons come with a range aspect, for example the short bow's Rng 20. Rng is short for range and 20 is its effective range in steps.
| Range | Effective | Hard | Stunted |
| Point-Blank | 5 | 10 | 0 |
| Close | 10 | 20 | 0 |
| Short | 20 | 40 | 0 |
| Medium | 40 | 80 | 0 |
| Long | 80 | 160 | 5 |
| Extreme | 160 | 320 | 10 |
Effective is the number of steps inside of which you make a normal attack. A short range weapon is effective up to 20 steps away. If your target is inside that distance treat it like a normal attack.
Hard picks up where Effective leaves off. A short range weapon will have a hard time hitting anything from 21 to 40 steps away. This is also the maximum range of an attack. A short range attack cannot hit anything more than 40 steps away. An easy way to remember this is that Hard is always double an attack's Effective range.
Stunted only applies to long range attacks. Anything inside of this range becomes hard to hit by being too close. If an attack's Stunted range is zero you can ignore it.
Area Attacks Area attacks are caused by spells like Fireball that bathe an area in damage. Their attack will have an aspect combining a shape with a radius. Fireball uses Blast 10. The shape of a blast is a full circle. Its radius is 10 steps.
To figure out who has been hit, hold your flashlight above the step the fireball detonates in. This is step zero. Now lift the light up and count off the steps as the light beam covers them. Once you reach 10 horizontally, every mini in the light will be hit by the blast.
Anyone straddling the edge of the beam should make a Luck Save. Succeed and they take no damage. A half fail takes half damage. A full fail takes full damage.
Stuns & Knock Downs In addition to everything that happens when a character is stunned or knocked down, with miniatures a stun will move a mini 1 step back away from the blow.
A knock down moves the mini 2 steps back and flips it on its side to remind us that it has been knocked down. When the mini is stood back up its player gets to decide which direction it will face.
Back Attacks Facing matters when dealing with miniatures! AC only protects the front and sides of a mini. DC protects its back. Shields do not protect against back attacks. Of course, if a creature has no discernable front or back then AC is used for all of it.
Retreat! You can use your normal movement to back away from a fight without penalty. Unfortunately, you can only run in a forward direction. Running away from a fight means turning your back to your opponent. Any attack they make against you will be a back attack.
Adventure
By now you should have a good idea of how the game is played. On the whole, we like to leave as much to the imagination as possible, but there are a few situations which call for some additional definition. That is what the Adventure section is for.
Keep in mind you do not need to know every rule to play the game, just a general understanding of how Dragonhead works and a willingness to look things up or make things up as needed.
Making Things Up Believe it or not, no one was shot at to figure out the rules for Cover. We got out some characters, rolled a few dice, thought about it for a bit, adjusted the rules, and thought about it some more. The process was repeated until finally something resolved which wasn't too convoluted and seemed about right.
That word Seem is important. It means that the ruling seemed right by way of what we know of reality and what the game mechanics will support. Think of it as your imagination's stamp of approval. When something seems right — that's a good sign — otherwise it's back to the drawing board.
No Do-Overs With all of this said, keep in mind that our time at the game table is limited and the game only moves forward. If you suddenly realize that a battle could have gone differently had you only known about Cover, no we cannot go back and do it again. Just try to remember it next time. Through hindsight is how much of this is learned.
Area Attacks
An area attack floods a space with damage, such as dragon's breath or a fireball. Anyone caught in it will be hit by the same amount of damage. Armor and Shield defend against it. AC / DC does not.
Area Shapes Areas come in different shapes identified by a term such as Cone or Wall. When looking down from above, possibly with a beam of light shining on some miniatures.
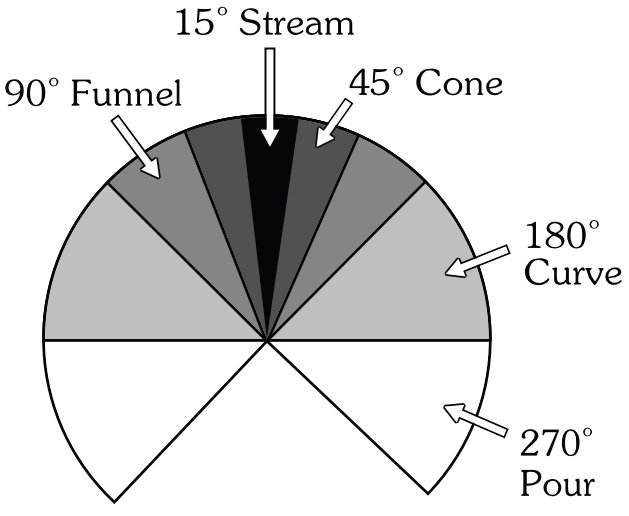
| Blast | = hits a full circle. |
| Stream | = a 15° angle. |
| Cone | = a 45° angle. |
| Funnel | = a 90° angle. |
| Curve | = a 180° angle. |
| Pour | = a 270° angle. |
| Cloud | = a projected circle. |
| Dome | = a bubble. |
| Cube | = a full square. |
| Torus | = a doughnut. |
Area Size The number attached to an area is its radius. This is the number of steps it extends beyond the step the attack originated in, for example:
| 0 | = Dinky. |
| 1 | = Small. |
| 3 | = Medium |
| 6 | = Large. |
| 12 | = Big. |
| 24 | = Huge. |
| 48 | = Massive. |
If the area doesn't have a size then its radius is equal to the damage done divided by 5 and rounded down. A Blast attack doing 30 points of damage has a radius of 6.
Blast A blast is essentially a sphere radiating out in all directions. An explosion with Blast 0 is like a firecracker. It hits anything occupying the same step as itself. A Blast 2 would hit that step as well as everything two steps around it.
Stream With miniatures, a streaming attack shoots forward in a line, hitting everything that crosses its path. Without minis a streaming attack can hit 2 different targets per success.
Cone, Funnel, Curve, and Pour With these step zero is always directly in front of the character creating it. They attack an ever-widening area the farther they fan out.
Cloud A cloud attack is like a Blast except instead of billowing out around the point of detonation this one projects forward one length of its radius and billows out around that point. This should protect the cloud's creator from being hit by it.
Cube A cube forms a square space that is as high, wide and deep as its size. A Cube 3 starts with 3x3x3 as its dimensions but it can be scrunched into different shapes such as a wall with 4x4x1 or a beam with 1x1x7, just as long as the three dimensions add up to triple the cube's size in steps.
Torus A torus is essentially a giant doughnut. It goes off like a blast but leaves step zero unharmed. This protected core can be widened without penalty but doing so does not change the overall size of the torus.
Dome A dome is a sphere whose sides drape to the ground. It covers everything as tall as the sphere including the ground beneath it. Up in the air it forms a bubble. Domes are more often used for defense rather offense. You measure it to see who is covered by a spell rather than hit by it.
Aspects
Aspects are tags attached to attacks and equipment. They are short-hand reminders of how things work. Most but not all are combat related.
1shot This item can be used once and never again.
2hds It requires two hands to work.
Activate This is the die roll you use to activate a magic item.
Ammo This is the number of shots a weapon can take before needing a reload. Natural attacks that use ammo, such as dragon's breath, reload as the creature sleeps. Weapons that need to be reloaded every time they are used will not have an ammo count.
Bastard A bastard weapon is a one-handed melee weapon made with an elongated grip so it can be used with two hands when needed.
When used with two hands it gains Damage +2. Using a non-bastard weapon with two hands only gives you Damage +1.
Turning a weapon into a bastard weapon increases its price by 25% and adds 1 lbs to its weight. Be sure to attach Bastard to its name, such as Bastard Sword or Bastard Mace.
Weapons that have Bastard as an aspect, such as the spear, are made for one-handed use but can easily be used with two hands for a +2 damage bonus.
Bal Bal stands for Balanced. Any melee weapon can be thrown at Point-Blank range but this hardens the hit. Balanced weapons suffer no such penalty.
Burst This attack fires off a machine gun like burst. The die roll tells us the number of shots that hit its target, all doing the same strength as the first shot (see the Burst rules below).
Close This attack was made for fighting in close quarters.
Cold This attack will flash freeze an opponent in place. The character needs to beat the strength of the attack with a Muscle check to break free.
Using a weapon to hack away at the ice makes the Muscle check easier, but crash the check and you hit yourself for one success of damage and half armor protection.
Def This is the ability an opponent defends themselves with against the attack.
Dur Dur is short for Duration. It tells us how long something lasts. A number is a number of rounds. A PS stands for Per Success. A spell with Dur 5 PS lasts five rounds per success.
Dur Enc This spell will last for an encounter or 10 minutes, whichever comes first. Basically, it lasts until the fight ends.
Dur Conc This spell lasts as long as its caster concentrates on making it last. Being stunned or trying to do something other than move around dismisses it.
Elec This indicates an electrical attack. An opponent wearing metal armor defends with DC and has their Armor and Shield reduced by half.
Fire This attack stands a chance of setting a creature on fire (see the Fire rules below).
Fragile This item is fragile. Any time a character carrying it falls or is knocked to the ground a Hard Luck Save should be made. Fail and the item breaks.
Grapple This attack simultaneously does damage and grapples whoever it hits when desired. Use the strength of the hit for the strength of the grapple (see the Grappling rules below).
Great Like Bastard, this aspect is normally found attached to the name of a weapon. It is a one-handed Melee weapon made larger and two-handed. It gains Damage +4, takes a Hit -1, and requires two hands to use.
Making a weapon great increases its price and weight by 50%. Be sure to attach Great to its name, such as Great Sword or Great Mace.
HD Half Defense. Armor & Shield rolls made against this attack will be cut in half.
Light This is the number of 10' squares a light source will illuminate beyond the one its bearer is in.
NAN No Activation Needed. This item may be magical but it does not require an activation roll. It is always on.
ND No Defense. Armor & Shield do not protect against this attack.
Poison The number attached to this aspect is the strength of the poison. It may also be further described such as Poison Paralytic 14 for a poison with a strength of 14 that paralyzes whoever cannot defeat it.
Reach These attacks have the benefit of reach. Weapons without it can only strike into an adjacent step. Reach can strike over 1 step of space. Reach with a number, such as Reach 2, can strike over that many steps of space. Unfortunately, reach weapons harden their hit rolls when used against opponents standing inside the reach distance (see the Melee Combat rules Miniatures).
Rng Rng indicates a ranged attack. The number beside it tells us its effective range, i.e. the distance inside of which the attack operates without problem. Double that number is its maximum range. A weapon with Rng 20 has no problem hitting anything from 1 to 20 steps away, a hard time hitting anything 21 to 40 steps away, and cannot hit anything 41 or more steps away (see the Ranged Combat rules Miniatures).
Rld Rld is short for Reload. Just a number tells us how many rounds it takes to reload the weapon.
Save The ability following Save is what you use to make a saving throw to defend against this attack.
Scar This attack does scar damage. Every tear it does should be blackened in instead of struck. Scar damage does not heal naturally and is hard to heal magically (see the Healing below).
SEP Single Effect Power. A character can only be effected by this power once. Casting a spell like Haste on a character multiple times does nothing more than cause the most recent cast to replace the older ones.
SL Size-Locked. This item is always medium-sized.
SUP Single Use Power. Future casts of this spell dismiss earlier casts of it. The spell Curse lasts until its caster casts Curse again. The new spell dismisses the old one, freeing whoever the curse was cast upon.
Time This is the amount of time it takes to cast a spell or commit some kind of action that cannot be pulled off in a single round. A number like Time 3 is a number of rounds.
During this time the character can do nothing but work on committing the action. If stunned or otherwise distracted the attempt will be lost and the character will have to start over.
Once the time requirement has been fulfilled a check for it can be made in the following round. So a spell with Time 1 can be cast every other round with the in-between rounds spent preparing for the next cast.
Touch To use this power a character must physically come into contact, skin to skin, with what it effects.
Body Size
While characters and creatures come in thousands of different sizes, we narrow it down to fifteen general body sizes to make the matter easier to handle:
| Size | Mass | Dmg | Dis | Hide | Example |
| Tiny | 0.3 | 0.4 | 0.6 | +6 | House Cat or Smaller |
| Teeny | 0.5 | 0.6 | 0.8 | +4 | Farm Dog |
| Small | 0.75 | 0.8 | 1 | +2 | Young Human |
| Medium | 1 | 1 | 1 | +0 | Adult Human |
| Large | 1.5 | 1.2 | 1 | -2 | Hobgoblin |
| Extra | 2 | 1.5 | 1.2 | -4 | Bugbear |
| Big | 4 | 2 | 1.5 | -6 | Ogre |
| Huge | 8 | 4 | 2 | -8 | Hill Giant |
| Massive | 12 | 6 | 4 | -10 | Fire Giant |
| Enormous | 15 | 8 | 6 | -12 | Frost Giant |
| Humongous | 30 | 10 | 8 | -14 | Dragon |
| Colossal | 60 | 15 | 10 | -16 | Kraken |
| Gigantic | 100 | 20 | 12 | -18 | Epic Dragon |
| Titanic | 300 | 30 | 15 | -20 | Leviathan |
| Gargantuan | 500 | 50 | 20 | -22 | Ancient Dragon |
Mass Mass is a multiplier based on the size of the character. A Big creature has four times the body mass of a medium-sized character. Things made for it will weigh four times as much. A Teeny creature only has half the mass. Things made for it will only weigh half as much and be half as large. The amount of food you need to eat to keep from starving should be multiplied by mass as well.
Mass also effects the price of items made to fit a certain size. It multiplies price when the size is greater than Medium. It does not change price for anything made smaller than Medium. Sorry, no discounts for the little people.
Dmg Dmg multiplies damage. It multiplies physical damage, meaning your Actual HP and Stun Point (but not Class HP). It multiplies the damage values of weapons (after ability modification) and spells. It also multiplies the defensive values of armor and shield. Note that all of these multiplications should have been made when the character was created and do not need to be made while playing the game!
Dis Dis multiplies anything having to do with distance (weapon ranges, area sizes, etc). When figuring out your movement rolls you should multiply the score by Dis right before turning it into a die roll.
Hide Hide is a modifier that effects a character's attempt to hide. It also effects Diving For Cover to avoid an explosion.
Muscle Muscle scores are multiplied by Size Mass but only after a character has been created. If you are making a teeny character and rolled a 12 for muscle, you should use a 12 when finding your hit points, attacks and everything else. Once the character has been created, then you would multiply the muscle score by your Mass and write down Muscle 6 (12) on your character sheet, with 6 being the adjusted score and 12 as the actual score.
Ex Ex is short for Exhaustion and is the base amount of damage you take when trying hard. Ex is your Dmg multiplier rounded down to a minimum of 1. A huge creature has Dmg 4 so it take 4 points of wear damage every time it tries hard to do something, 8 with try harder and 12 with try hardest.
AC / DC Any time you are fighting someone with a body size that is larger than your own, you get to make easier AC / DC rolls, providing you remember to do so. When a source of damage doesn't have a body size, such as a trap or fall, body size has no effect on AC / DC.
Slip Thru Slip Thru attempts are also made easier when trying to move through a space occupied by someone bigger than yourself.
Burst Attacks
A burst attack is one that can fire off a machine-gun like volley of missiles. Typically this hardens the hit being made with it. The die roll following the attack's burst aspect is the number of shots that hit. For example:
| Light | = Burst 1d4 |
| Small | = Burst 1d6 |
| Medium | = Burst 1d8 |
| Large | = Burst 1d10 |
| Heavy | = Burst 1d12 |
After rolling to hit, roll the burst die and that tells us how many shots hit the target. Each shot does the same amount of damage. A separate roll of Armor & Shield should oppose each shot. When ammo matters, the number of shots fired is equal to the best number on the burst die. A medium burst fires off eight shots.
Spreading the Burst You can fan a burst out over an area but doing so will impact your burst roll:
| Tight concentration (15° angle) | = -1 |
| Loose concentration (45° angle) | = -2 |
| Wide spread of fire (90° angle) | = -4 |
A medium burst spread over a wide area rolls a 1d8-4. Any roll less than 1 spreads the burst so thin it misses everything. Otherwise, everyone in that area should make a Luck Save. Each target takes one shot. Start with the lowest luck strength and move up through the rest until the burst runs out of shots. Run out of targets first and you should cycle back to the lowest luck strength and do it over again until every shot has been accounted for.
Climbing
Climbing is a Dexterity check made hard or easy by just how intrepid the climb is, whether you have done it before, and if you are using climbing gear.
| Dexterity | |
| 1: | You made it! |
| H: | Almost. Make the check again. |
| F: | Fall from half way up. |
| C: | Fall from all the way up. |
So if you are trying to climb a 40 foot cliff it takes one or more successes to do it. The more successes you land the quicker you make the climb. With a half fail you slip but catch yourself and now need to make the check again. With a full fail you fall from half way up. With a crash you fall from all the way up. See Falling below for how much damage a fall does.
Cover
Taking cover means hiding behind something to protect your character. You do this as part of your Move for the round. There are two levels of coverage, each effects the difficulty of anyone attacking you.
Partial Cover All but a small part of your body is covered. You become a hard target to hit but may return fire with a ranged attack without problem.
Full Cover You believe yourself to be completely hidden behind something. This makes you a heavy target to hit but you cannot return fire to keep it.
Diving for Cover Against an area attack use your action to dive behind what you hope will cover you and make a Dexterity or Luck check. Be sure to talk about the area you are in and what you intend to dive behind, this should make the check easier to perform.
| Dexterity or Luck | |
| 4: | No Damage. |
| 3: | Tenth Damage. |
| 2: | Quarter Damage. |
| 1: | Half Damage. |
| H: | Full Damage. |
| F: | Double Damage. |
| C: | Triple Damage. |
Success determines how much damage you take. Armor & Shield does protect against explosions. AC / DC does not.
Damage Type
Damage is a measure of force. Damage Type is what makes that force lethal.
- Piercing focuses the force of the blow onto a point, like the tip of a spear or arrow.
- Sharp focuses the force along the edge of a blade such as a sword or battle axe.
- Mixed combines sharp edges with brute force. The morning star, a club covered in spikes, is a classic mixed weapon.
- Blunt focuses that force onto a wide but blunt area, such as the head of a mace.
- Impact spreads the force over an even wider or more pliable area, such as the shaft of a quarter staff.
All weapons are designed to do a specific kind of damage, but you can change the way you use a weapon to change its damage type. Consider the spear. It does piercing damage by default, but you could slash with it to do sharp damage or hit with the blunt end of its shaft to do blunt damage or even use it like a quarter staff to do impact damage. The drawback is that using a weapon to do a type of damage it was not designed for will always harden the hit.
Falling
The damage done by a fall is equal to the height of the fall turned into a die roll. Half of your Armor & Shield roll protects against it. What you land on determines the damage type.
| Damage Type | Surface Examples |
| None | Water, Snow, Hay. |
| Impact | Grass, Dirt, Mud. |
| Blunt | Cobblestones, Slate Floor. |
| Mixed | Broken Timber, Jagged Rocks. |
| Sharp | Broken Glass, Pile of Weapons. |
| Piercing | Spikes, Stalagmites. |
Fall 10 feet into a pit full of spikes and you take 1d10p in damage. If you don't know what the surface is, make a Luck Save to find its damage type.
| Luck Save | |
| 3: | None. |
| 2: | Impact. |
| 1: | Blunt. |
| H: | Mixed. |
| F: | Sharp. |
| C: | Piercing. |
Falling While Flying Characters who are stunned while up off the ground (flying, gliding, climbing, levitating, etc) will plummet towards it. When we don't know how high they were but suspect they were at a hundred feet or less, roll 1d100 to find the damage taken.
Above a hundred feet a flying character should be given a Spirit Save. If successful the character shakes off the shock and may resume flying before hitting the ground. Otherwise roll 2d100 for damage.
Fire
Anyone hit by an attack bearing the Fire aspect should make a Luck Save to see if the character has been set on fire.
| Luck Save | |
| 1: | Nothing Happens. |
| H: | Fire Damage 1d4b per round. |
| F: | Fire Damage 1d8b per round. |
| C: | Fire Damage 1d12b per round. |
Fire damage should be rolled once at the end of each round until the blaze is extinguished, this includes the round that started the fire. Half of your Armor & Shield roll will protect against it. Being Fire-Resistant reduces the damage by half.
Using your action to do a stop, drop and roll lets you remake the Luck Save once per round. Diving into something like a pool of water puts the flames out instantly.
Grappling
A grapple is when you grab an opponent and wrestle them into submission. Make a Muscle check as your attack, adding a class or skill bonus for unarmed combat if you have it. Whoever you are grappling should do likewise, possibly using Dexterity instead of Muscle if all they want to do is escape.
Muscle Vs Muscle or Dexterity
If the strength of the grapple can beat the strength of the escape then the grapple succeeds. Both characters are stuck there, unable to move or do anything for as long as the grapple is held. DC defends against any attack headed their way.
Round After Round After the grapple is set the grappled character may try to escape it once per round. The grappler does not need to do anything to continue holding the grapple at its current strength. They may try to reset the grapple, hoping to get a better strength, but by doing so they give their captive another chance to escape.
Dog Piling Grappling isn't always between just two characters. Multiple characters may enter the fray. Have everyone make a Hard Muscle check and count the number of successes. A full fail loses one success. A crash fail loses two. The side with the greatest number of successes controls the grapple.
Healing
Adventure is brutal, exhausting business and eventually you will need to recover from it.
Resting Wear damage is easily healed. Stop to rest for a minute, make a Constitution Save and recover 1d6 in wear damage per success. Be sure to mark this down as experience points where 1 Wear = 10 XP.
The catch is that you can only rest ten times per day. Note the letters inside the rest circles on your character sheet. The E stands for Easy and your first three rests will be easy ones to make. The H stands for Hard and your last three rests will be hard to make. Mark them off as you use them.
In combat it takes 20 rounds of doing nothing to rest, making it very hard to rest during combat unless you have been knocked unconscious. Unconscious characters start to rest on the round following the one where they hit the floor.
Sleep A full night of sleep (eight hours) recovers all wear damage and clears out your rest circles. Such sleep can only be had in a relatively safe place and you cannot sleep in your armor. Ignore either of these and you only recover half of your wear damage and rest count. Ignore both and you get nothing.
Long Term Healing Tear damage is far harder to heal. You need to spend a week convalescing — doing as little as possible — and at the end of it make a Constitution Save. Now you recover 1d6 in tear damage per success. A full fail turns 1d6 tears into scars. Blacken them in. A crash fail means you died of gangrene.
Magical Healing The quickest way to heal damage is with magic. Everything that does so works like an attack in reverse. The damage it should do now heals wear and tear on your character. You do gain XP for magical healing. It does not count as taking a rest. Magic can be used to heal scars but all other tears need to be healed first and it takes 5 tears worth of repair to heal one scar of damage.
While using magic to heal wear damage feels pretty good, using it to heal tear damage hurts like hell. Magic quickly sears together open wounds. This feels a bit like rubbing salt in a cut, dousing the salt in kerosene and lighting it on fire. It is impossible to do anything for one round per tear recovered while this is happening. Often a white discoloration will cover the damaged skin and it may take a couple of months if not years before it returns to its normal color.
Beware those who come streaked in white!
Like Lightbulbs You cannot recover wear damage in a torn circle. To this extent, damage circles are a bit like lightbulbs. Wear damage causes the bulb to dim, but this is easily fixed by a sudden influx of energy. Tear damage causes the bulb to burn out. The bulb itself needs to be replaced before it will burn again. How many clerics does it take to change a lightbulb? Hopefully just one. Scar damage takes a hammer and smashes the bulb as well as the socket it sits in. Nothing short of a miracle will replace that bulb and get it burning again.
Hirelings
Hirelings are creatures you hire to accompany the party on an adventure, possibly to guide your way through the wilderness, fight on your behalf, or simply hold a torch.
Hiring Hirelings How much this costs per day depends on the level of the hireling, your character's Charisma and the hireling's Intellect (or lack thereof).
| Charisma vs Intellect | |
| 3: | $10 per level. |
| 2: | $20 per level. |
| 1: | $30 per level. |
| H: | $60 per level. |
| F: | Sorry mate, no sale. |
| C: | Did you just insult my mother? |
Roll up one success while trying to hire a third level fighter and it will cost you ($30 x 3) $90 per day for their service. Hirelings will want at least a week's pay in advance or possibly more for longer journeys.
Loyalty During the adventure, any event outside of what the hireling signed on for (ex: being arrested, having magic used on them, starving from lack of food, etc) will be cause a loyalty challenge. This is a Charisma Save vs Wisdom pitting the employer's charisma verses the hireling's wisdom. It is a secret challenge. The employer will not know the outcome until it is already too late.
Rout, Run & Mutiny! A lost loyalty challenge will become apparent once the hireling takes the next best opportunity to disappear into the wilderness.
Good hirelings often sneak off into the night hoping to never run into the party again. They may even leave behind their advance as a token of good will.
Neutral hirelings will also disappear. Not only will they not return their advance but they may steal a few things on the way out.
Evil hirelings will not only steal and run but they may hang out in the wilderness, stalking the party, hoping to pounce on them as they return home, weak yet laden with treasure.
DM Controlled No matter how much force of charisma a character has over their hirelings, they are ultimately creatures run by the DM. Treat them badly, use them as meat shields, force hirelings to take risks a character is not willing to take and all agreements are off. The hirelings will quit on the spot and even the good ones may come seeking retribution.
Max Number of Hirelings? The only thing limiting the number of hirelings a character can have is the amount of money they have to spend on them. What works for a small party of adventurers also works for a continental army.
Rebellion! When it comes to large numbers of hirelings and the matter of loyalty, the DM should choose an NPC to represent the whole group. This will be a revolutionary leader actively instigating revolt against the employer.
Instead of a loyalty challenge there should be a Charisma Save Competition between the two. If the rebel leader wins, the rebels break away to become a separate faction under the rebel leader's command. Otherwise the rebel leader will be abandoned and have to flee.
Kicks
Sometimes you kick, and sometimes you get kicked!
Kicks are a bit different from other attacks. They still abide by the 1 attack per appendage rule, but if you moved during the round then you used your legs and cannot make a kick. If you didn't move then you still need one leg to stand on and can only make one kick as your entire action. Your arms will either be busy holding a shield or helping you keep your balance.
Kicks & Grapples When caught in a grapple, you may make a kick attack (possibly kneeing an opponent in the gut or stomping on their foot) but it will always be a hard one. If you are maintaining the grapple and fully fail with your kick you let go of the grapple.
Trample A trample is where you simply run someone over. This hits with one kick from every two legs. For stun purposes, add up the damage done by all the kicks and compare the total to the character's stun point as if it all came from just one hit. So being trampled by a human is essentially a kick attack. Being trampled by a horse is like getting hit by two kick attacks whose damage combines to stun or knock an opponent down.
Leaping
To leap over something substantial make a Muscle or Dexterity check minus any Move penalty you might get from your equipment. Difficulty comes from just how far you have to jump and how intrepid the leap is. There is a big difference between jumping over puddles and leaping between roof tops.
| Muscle or Dexterity - Move Penalty | |
| 3: | You make it with a back flip or two. |
| 2: | You make it in style. |
| 1: | You make the leap. |
| H: | You are on the other side dangling by your fingertips. |
| F: | GAHhhhhhhhhhhhhhhhhh-hhh!!!!! Splat. |
Any character who is dangling by their fingertips will need to make a successful Muscle check minus the Move penalty to pull themselves up. Others who are already on that side can help pull the character up by making a Hard Muscle check and adding its strength to the strength of the dangling character.
Magic Items
Items bearing a quality bonus, such as a Sword +1, are not necessarily magical and will add that bonus never failing. Those that do something magical, such as a Wand of Fireballs, need to be activated every time they are used.
Activation! Point the item in the right direction, say its incantation, roll the dice and hope for the best. Success determines just how much magic comes pouring out. Nothing helps this roll. Use your Magic ability plus any quality bonus the item possesses.
| Magic + Quality | |
| 1: | It Works! |
| H: | Nothing Happens. |
| F: | Item Breaks. |
| C: | Item Destroyed! |
Fragile Things With a half fail nothing happens. Try again next round. Fully fail the activation and the item goes Pfzzt! and will never work again. Crash the activation and not only does it break but the DM will roll on the magic item crash table, which is never a good thing.
Magic Weapons If the item is also a weapon, such as a Sword of Flame, write it in your Attacks list with the hit modifier it uses as a weapon under Hit. In Aspects include its activation modifier (Magic + Quality) under the aspect tag Activate.
Now when you go to use the weapon, spend the first round activating it, lighting up the sword with an Activation check. In the rounds that follow, use its Hit modifier to make attacks. Nothing happens when these rolls fail to hit, except you miss your target.
Potions & Scrolls These work once and that is it. Three rounds of dedicated action are needed to consume a potion or read a scroll aloud. A half or full fail reveals the item to be a dud. Crashing does much worse. Potions always effect the character who imbibes it. Scrolls almost never effect the reader of the scroll. Instead they shoot magic in the direction the character reading the scroll is facing.
Identifying Magic Items Most magic items do not come with a tag to tell us what they do, and those that do should not be trusted. To properly identify a magic item you need to take it to someone who does this professionally. Usually, identification takes 1d10 minutes and costs 2d6 silver pieces per item.
| Intellect + Class Bonus | |
| 2: | Knowledge with absolute certainty! |
| 1: | Identifier is fairly certain of what it is. |
| H: | Hasn't a clue. |
| F: | Believes it to be something it is not. |
| C: | Accidentally breaks the item. |
Morale & Fear
Morale is a Spirit check made by characters and creatures when a combat encounter starts to go south and instinct is telling them it's time to bug out. Typically this means:
- Right after being on the losing side of a Surprise Attack.
- Right before engaging in battle with a formidable opponent.
- After tear damage passes a creature's Morale point.
- When an opponent has reinforcements arrive.
- When a group's leader has been incapacitated.
- When half or more of ones own side has been incapacitated.
The Morale point is an M that appears in a creature's damage circles. They only need to make a morale check the first time tear damage passes it during an encounter. Other times will have no effect. Incapacitated means knocked unconscious, killed, paralyzed, or in some way taken out of action. It does not include being grappled, stunned or knocked down during combat. As for the check:
| Spirit | |
| 1: | Continue to fight! |
| H: | Back away from combat. |
| F: | Turn and flee. |
| C: | Run away screaming. |
With a half fail you can no longer fight. Instead, a character will back away from combat, seeking the nearest escape route. With a full fail the character turns and flees. Any attack made against it will hit its back side. With a crash the character turns and runs. All attacks hit its backside and while it gets to roll for movement twice it will have a hard time making any check while fleeing.
Anyone trapped with no way to escape will throw down their weapons and surrender. Anyone who fully failed or crashed the check will also collapse into a blubbering mess, pleading for mercy.
Fear Fear checks are the same as Morale checks except their causes tend to be more sudden. The major change is that you make a Spirit Save instead of a nomal check and you don't get any bonuses from the leadership of others.
Resolve Classes with the Resolve talent get to add their class bonus to Morale and Fear checks. If the class gets resolve at a certain level, subtract the Starts At level from the Class Bonus and add 1. Halflings get Resolve at third level, so a halfling gets a +1 bonus at 3rd level, a +2 at 4th, a +3 at 5th and so on.
Leaders Anyone being led by a character with the Leadership talent gets to add that character's Class Bonus to their morale checks but not fear checks. The drawback is that if your leader is ever incapacitated, that will be cause for a fear check. A character may choose to intentionally refuse the leadership of another character to avoid this.
Creatures When a morale check is called for everyone on a side needs to make it. While not a problem with characters, this can get cumbersome with large numbers of creatures. DM's should either divide the creatures into groups and make one roll per group (it's easier to make six rolls for six groups of goblins than thirty six separate rolls) or make one morale check for the creature's leader and if the leader loses it everyone following that creature will do likewise.
Undead and Automatons You need to fear death for morale to have an effect on you. Because of this the undead and similar non-living or unaware creatures (like slimes and oozes) do not make morale checks. If there is no M in the damage circles of a creature's stat block it is not effected by morale.
Picking Pockets
When picking a pocket, the Mark is whoever is being pick-pocketed. Beat the mark's wisdom strength and you lift a single item off their person. The more successful you are the longer it takes for them to notice that the item is gone.
| Dexterity vs Wisdom | |
| 4: | Notice in 1d6 days. |
| 3: | Notice in 1d6 hours. |
| 2: | Notice in 1d6 minutes. |
| 1: | Notice in 1d6 rounds. |
| H: | Fail to snatch the item. |
| F: | Fail and be caught trying to steal it. |
| C: | Owner gets to make a surprise attack! |
Fail! With a defeat or half fail you do not grab the item. With a full fail the mark catches you in the act. With a crash the mark not only sees you coming but can make a surprise attack on you as you go in for the grab — no wisdom check needed!
Factors This check is made hard by just how well protected the item is. Maybe it is overly large or hanging around a person's neck. If the item is too big, watched, or securely attached it cannot be lifted.
Distraction Having someone distract the mark makes their Wisdom check harder to make. Gamewise, whoever is making the distraction should make a Charisma check. Describing some creative way in which the character is distracting the mark should make the distraction easier to do.
| Charisma | |
| 1: | Each success hardens the Wisdom check. |
| H: | Nothing happens. |
| F: | The mark gets suspicious and makes an Easy Wisdom check instead. |
| C: | The gig is up! The mark cannot be pick-pocketed! |
Poison
Poisons come with a strength that needs to be beaten with a Poison vs Constitution Save. The kind of poison determines what happens when the poison wins:
- Lethal Poison The character falls unconscious and will die in 1d6 hours minus 1 hour for each success. At less than an hour the character dies instantly.
- Knock-Out Drug The character is knocked unconscious for 1d6 hours per success. No actual damage is taken.
- Paralytic Poison The character will be immobilized yet still aware of all that is happening for 1d6 hours per success.
- Hallucinogen The character trips through wild dreams, barely conscious of the actual world. It lasts 1d6 hours per success.
- Intoxicant For each success the character gets a Drunk hindrance (ex: Drunk x3 for three successes) which makes everything the character does harder to do. It takes two hours to remove each of them.
Venom Poisons are imbibed while venom is injected — snake bite, scorpion sting, a poisoned dagger — all of these need to do at least 1 tear of damage to deliver a dose of venom.
Antidotes An antidote is a reverse poison. If administered within 10 minutes of a poisoning and if the antidote's strength can defeat the strength of the poison it will neutralize the effect. The antidote will bring back from the brink of death anyone "killed" by a lethal poison. Administering an antidote requires a successful Intellect or Wisdom check.
Dosage Size Some poisons come with a dosage size, such as Huge Paralytic Poison. Every body size a character is larger than the dose will make the Constitution Save easier. Every body size smaller makes the save harder.
Larger = 1 Easy per size difference.
Smaller = 1 Hard per size difference.
When no size is mentioned the dose is Medium by default. Unless it is produced by a creature. In which case the dosage size matches the size of the creature. A huge scorpion delivers a huge dose of venom.
Push
Sometimes all you want to do is push the other guy around. With a successful Trip, Throw or Tackle your opponent will be knocked to the ground and need to spend 1 action standing back up again. Any damage taken is fall damage. Half armor and shield protects against it. Damage type depends on the landing. Getting thrown to a stone floor does blunt damage. A bed of spikes does piercing damage. Attempting any of these counts as your action for the round.
Trips You knock your opponent on their butt. This is a Dexterity Challenge doing 1d4 damage per success. You cannot trip anything with a body size that is more than two sizes larger than your own.
Throws You pick your opponent up and slam them down. This is a Hard Muscle vs Muscle or Dexterity challenge doing 1d8 per success. Your opponent can be thrown up to 1 step per success in a direction of your choosing.
Tackles A tackle slams your opponent to the ground. It uses Muscle vs Muscle or Dexterity and does 1d6 per success.
Rushes With a rush you try to push your opponent around. This is a Muscle Competition. No damage is done. The winner pushes the loser a number of steps equal to the difference between the two muscle strengths.
Scrums A Scrum is where two groups band together in an attempt to push the other group around. Everyone makes a Muscle check and we count the successes. Each full fail reduces the team total by 1. A crash reduces it by 2.
The side producing the greatest number of successes wins it. Find the difference between the two success counts and that is the number of steps the losers get pushed in a direction of the winner's choosing. When the count ties, a scrum goes nowhere.
| Push | Check | Damage |
| Trip | Dexterity vs Dexterity | 1d4? |
| Throw | Hard Muscle vs (Mus or Dex) | 1d8? |
| Tackle | Muscle vs (Mus or Dex) | 1d6? |
| Rush | Muscle Competition | none |
| Scrum | Group Muscle Competition | none |
Role Playing
Role-Playing is where you assume the persona of a character and say what that character might say given the current situation.
While this sounds simple enough, many choke on it because of all that the imagination has to leap over to make it work. The role-player may not look or sound anything like the character they are portraying, and you will probably be sitting around a table instead of standing on a stage filled with elaborate set pieces or wearing a costume. It often feels a bit goofy but it can be done.
Easier Than It Looks It is good to remember that we are not expecting Shakespeare so much as a campfire skit. You do not need to talk in a funny voice to portray a character. Often it is better when you don't as that gets exhausting after awhile. The DM can, but the DM may only be portraying a creature for a minute or two. There is no telling just how long your character will be around. Do you really want to spend hours upon hours talking like that?
Switching Characters To switch between characters try doing what authors do. Verbally introduce the character by name before speaking as them. Say something like, "Well, Megan says to the guard..." and with that established you go on to speak as Megan and continue speaking as her until she is finished or you switch to a different character by saying, "And Ralph is like...," at which point you speak as Ralph. Once you stop speaking you go back to being yourself.
The Power Word Like The word Like may not seem like much, and if you remember the valley girls of the 1980's you know it can be abused, but Like is a powerful word. It introduces you as doing something more than just speaking on a character's behalf. You think like them. You emote like them. When you wave your hands around it is easy to imagine the character doing something just like that.
So don't use the word Like too often, but do realize that it is key to unlocking what role-players truly crave. Acting like a character takes you closer to being that character, at least for a brief moment in time.
Reaction Rolls
Most creatures will see the party as a threat and attack on sight. If there is no obvious reason to attack the DM may call for a Reaction Roll. This is a charisma check made by whoever is first to open their mouth and try to talk to the creature. Inclination differences between the two may harden the check. Similarities may ease it. If there is no parlay between characters and creatures roll a 1d20 to find the reaction.
| Charisma | |
| 3: | Ecstatic! |
| 2: | Friendly. |
| 1: | Indifferent. |
| H: | Belligerent. |
| F: | Attack! |
| C: | Destroy!!! |
Ecstatic! This means the creature is enamored of you, willing to bend the rules for you, but nothing crazy or suicidal.
Friendly. The creature thinks you're pretty cool. Don't ask for too much and you might just get it.
Indifferent. The creature doesn't care one way or another and is probably just hoping you will go away.
Belligerent. Openly antagonistic, they will attack anyone who seems like a pushover.
Attack! You really ticked them off. Unless doing so you seems suicidal they will attack.
Destroy!!! Something you said struck a nerve. Not only are they going to attack but they have just made your destruction their life purpose.
Reloading
Any weapon that fires a missile needs to be reloaded before it can be fired again. If the weapon has an aspect like Rld 1 that is the number of rounds it takes to reload the weapon. A crossbow with Rld 5 needs five rounds to be reloaded. The character can do nothing except reload the weapon during this time.
Although bows need to be reloaded, they have no Rld number. This means it quickly reloads every time you shoot it.
Slip Thru
Normally, you cannot move through a step occupied by another character or creature. However, if you are dexterous enough, you may be able to sneak past them with a Slip Thru. This is you ducking under, sliding past, or possibly even vaulting over whoever is in the way.
The check uses your Dexterity minus any Move modifier brought on by your equipment. Trying to get past an ally is an Easy check. Slipping past an enemy is a Hard check. Trying to get past someone who is simply in your way is a normal check.
| Dexterity - Move Mod | |
| 1: | You make it thru! |
| H: | Lose the rest of your movement. |
| F: | Stunned. |
| C: | Knocked Flat! |
A half fail means you can't get past them and lose the remainder of your movement in trying to. A full fail means you run into them and are stunned as if hit in combat. A crash fail knocks you flat on your back and now you need to spend an action standing back up again.
Back Attacks A slip thru is considered a part of your movement. You can make as many of them as you can and it won't effect the attack part of your action (unless you screw it up). One reason you might want to do a slip-thru is to make a back attack on an opponent. Succeed and you end up behind them. They defend with DC instead of AC. Shields do not defend them.
Surprise Attacks
A surprise attack is an ambush. No initiative is rolled. Instead, everyone who is hiding makes a Wisdom check to see how well they are hidden. Those about to be ambushed also make Wisdom checks to see if they notice it. When the worst strength of the ambushers can beat the best strength of the ambushees a surprise attack happens.
Worst Ambusher > Best Ambushee = Surprise Attack
The party launching the surprise attack gets one round where they can attack and the surprised party can do nothing. Stupefied, they defend with DC. If there is another round after this one it continues as normal combat.
Vision
There are four levels of light in this game: Daylight, Normal, Dim and Dark. Daylight is bright and cannot be replicated by artificial means. Normal light is the kind of light you get from torches, lanterns and candles. Dim light is darker with muted colors, like the light of a full moon. Dark is a complete absence of light. How different levels of light effect your character depends on their kind of vision.
Normal Normal vision works well in daylight and normal light but checks harden in dim light and become heavy in complete darkness. Any activity that requires light (like reading) cannot be done in the dark. Anyone who doesn't have ultravision will have normal vision by default.
Infravision Infravision sees heat patterns. It cannot see colors or be used to read, but infravision can see equally in all levels of light. Infravision may be blinded by large sources of heat. It also tends to miss anything whose body heat is the same as the ambient temperature of the room. For this reason, infravision cannot see undead creatures. It takes one combat round to switch between infravision and normal vision.
Ultravision Ultravision sees the minute traces of radiation that everything gives off. It is good enough to read with but colors often come across as garish and weirdly flourescent, like seeing the world through a blacklight poster. Ultravision is the reverse of normal vision. It works best in complete darkness and dim light. Normal light hardens it. Daylight makes it heavy. Sunlight is especially painful to those who have ultravision and will eventually blind them if exposed to it for too long. While all of this may seem like a lot, it is pretty easy to keep track of using the table below.
| Vision | Daylight | Normal | Dim | Dark |
| Normal | — | — | Hard | Heavy |
| Infravision | — | — | — | — |
| Ultravision | Heavy | Hard | — | — |
Options
Options is reserved for those rules which haven't exactly made it into the game. These are ideas which may be experimental or seem promising yet possess some kind of complication which is holding them back. You may use optional rules in your game just be sure to talk it over with the rest of your group. Should any of optional rules become a permanent fixture of your campaign, write it down somewhere as a House Rule. Keep this list handy so you don't burn up too much brain power trying to remember if a rule is in use or not.
Armor Sacrifice
Armor Sacrifice lets your armor or shield take tear damage instead of your character. It has no effect on wear damage but you can subtract from the defensive value of a piece of armor or shield any tear damage heading towards your character. A medium shield has a defensive value of 6 so it can absorb up to 6 tears of damage before being rendered useless.
The reason Armor Sacrifice is optional is because of the book-keeping involved. When it happens you need to flip your character sheet over, subtract the tear damage from the defensive value of something in your equipment list, flip the sheet back over and subtract the same amount from your Armor or Shield and then replace those die rolls with new ones.
Armor Sacrifice will send bits and pieces of armor flying but never enough to effect your Move scores, not unless you decide to chuck a now worthless helmet or shield.
Parry
Parrying blows with your weapon is considered a part of what makes your defenses work but for the most part it is over-looked by the system. Parrying is something your character does automatically without you having to mention it.
Parrying in place of an attack is something you need to declare in combat. It is something you intentionally do to either avoid taking damage or stop someone within reach of your attack from taking damage.
Essentially, if you haven't gone yet in this round, you can declare that you are parrying blows when an attack comes your way. Roll to hit, find the success of the attack, roll for damage and those become Parry Points that can be spent reducing the damage of attacks like an extra layer of armor. Parry point are lost as they are used and do not carry over between rounds. So use them before you lose them!
You can use different kinds of attacks to parry other kinds of attacks (ex: parrying a Ranged attack with a Melee attack) but this changes the number of parry points it takes to thwart 1 point of damage using the table below.
| Parrying | Melee | Ranged | Thrown | Unarmed |
| Melee | 1 | 3 | 2 | 1 |
| Ranged | 2 | 4 | 3 | 2 |
| Thrown | 2 | 4 | 3 | 2 |
| Unarmed | X | X | X | 1 |
The rows are what you are using and the columns are what you are parrying. So a Melee attack requires 1 parry point to stop a point of melee attack, 3 points to stop a point of ranged attack, 2 points to stop a point of thrown attack, and 1 point to stop a point of unarmed attack. Unless something says otherwise, unarmed attacks can only parry other unarmed attacks.
Why is it optional? In a word: bookkeeping. To make it work you need to keep track of a mess of numbers. It also helps to truly know that parry table by heart so the game doesn't slow down as people try to remember how it all works.
Realistic Rolls
Probably the biggest complaint people have about the d20 system is that the d20 itself is too swingy. It brings too much randomness to the table and often creates unrealistic if not flat out ridiculous results. Dragonhead whole-heartedly agrees. Our answer is to let you choose the dice you want to roll. You don't always have to roll a 1d20.
Play It Safe To play it safe roll a 3d6. This is what nearly everyone does on a day to day basis. Because of Dice Curve Probability you will most likely end up with a roll of 7 to 14, as shown in the graphic below where the taller the colored bars are the more likely you will be to roll them. Without any modifiers, the red bars are a crash fail, the orange bars are a full fail, the yellow bars are a half fail, the green bars are a single success and the blue bars are a double success.

So when playing it safe you will most likely end up with a half fail (which is also a half success) or possibly a single success if you have some modifiers to add to it. You will be less likely to crash or roll a double. No Guts, No Glory.
Take A Chance
To increase the amount of risk you are taking, roll a 2d10. By all means, this should be the main roll of the game, not the d20. Rolling a 2d10 creates more of a probability pyramid than a curve. It also comes with a one point advantage over the other two rolls, making it somewhat easier to succeed with.

Risk It All
Or you can stick with the 1d20. There is nothing wrong with that, except you are truly going out on a limb and run the biggest risk of crashing when rolling it. Only crazy people roll a 1d20 for everything.

A good reason to use realistic rolls is because it makes more sense than rolling a d20 for everything, especially for instances where there is just not a lot of risk involved.
A good reason to not use realistic rolls is because deciding on what to roll is just one more thing to think about and most people are fine with rolling a d20 for everything.
Swing Initiative
With Swing Initiative you figure out initiative in the usual fashion but instead of everyone on a side going all at once, just one character or creature from the winning side goes. After that one character or creature from the other side goes. Back and forth combat swings between the two sides until everyone has gone. At that point the current round ends and a new round begins.
A good reason to use it is because swing initiative does a better job of capturing the general chaos of combat. It no longer feels as if one side is standing still, waiting to take damage, while everyone else moves around them. It also leads to strategic thinking as you try to decide who should go first and who should save their action for later.
A good reason to avoid it is because swing initiative is harder to keep track of as the game bounces around the table, especially with large numbers of players or people running multiple characters. Swing initiative is also slower than normal combat. If you have ever picked a kickball team in gym class you know just how much time can be wasted trying to choose someone from a bunch of characters.
Cardinal Rules
Once you understand them, all of these rules can be changed to your liking. There are only three that cannot be modified or over-ruled. We call them the Cardinal Rules.
What Seems Real Is Real Reality is a big and beautiful thing. To capture it in all of its glorious detail with every single oddity, conundrum and contradiction perfectly set in place would require the creation of a gaming system that is as vast as the universe itself. As it is we have a small fast-moving game that runs on pencils, paper, dice and imagination.
When you come across an absence in the rules, an oversight or something just that doesn't make any sense? Think about it. Try to see the adventure as if it were really happening and listen to your imagination.
What seems real is real.
The DM is Always Right Even when dead wrong. Deciding what is real about spaceships, magic and elementals is no small task, so no matter how off-center, irrational or glaringly bad a DM's decision may be the Dragonhead Master is always right. In every debate the DM has final say.
This is not because we believe your DM to be infallible (far from it!) but because games only suffer when people waste time arguing about what one thing or another actually means. The DM always has a good reason for doing whatever the DM has done and is under no obligation to explain it. Just take it on faith that everything will all make sense in time. Of course, any DM who abuses this privilege had better be prepared to find a new gaming group sometime soon.
The DM is always right.
Always Play to Win There are no winners or losers in RPGs. This sage old advice is utter nonsense. These games can be won and they can be lost, but not in the way that most might think.
You will know you are losing when boredom sets in. When conversations stray from the adventure at hand. When people start playing with their phones rather than their character sheets.
You are winning when the air crackles with laughter and excitement. When eyes widen and people wish the adventure would never end.
That is winning!
And winning is the responsibility of everyone at the table.
We all win or we all lose.
Always play to win!